


XEROX WIDE FORMAT COPY SYSTEM Main Menu • 127
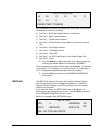
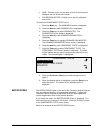
1. Press the Menu key. The MAIN MENU screen is displayed.
2. Press the Next key until DIAGNOSTICS is highlighted.
3. Press the Enter key to select DIAGNOSTICS. The
DIAGNOSTICS menu screen is displayed.
4. Press the Next key until SCANNER DIAGNOSTICS is displayed.
5. Press the Enter key to select SCANNER DIAGNOSTICS. The
SCANNER DIAGNOSTICS menu screen is displayed.
6. Press the Next key until COMPONENT TESTS is highlighted.
7. Press the Enter key to select COMPONENT TESTS. The
COMPONENTS TESTS menu screen is displayed.
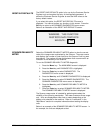
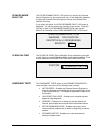
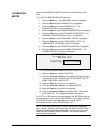
8. Press the Enter key to select SENSORS. Depending on the
Document Feed-in Tray configuration, with or without a
Productivity Tray one of the SENSORS screen shown below is
displayed. The first screen below is without the Productivity Tray
The status of each sensor displays as NO. INPUT, EXIT, LEFT,
RIGHT, HOME and REGISTER are the optical paper sensors.
THICK is the Thick Document Sensor. The second screen below
is with the Productivity Tray. When a sensor is activated the icon
O is filled in.
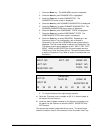
SENSORS
INPUT: NO
EXIT:
NO
HOME: NO
LEFT: NO
RIGHT:
NO
REGISTER:
NO
THICK: NO
SENSORS
INPUT:
O
EXIT:
O
HOME:
O
REGISTER: O
THICK: O
O O O O O O O O O O
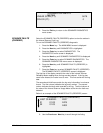
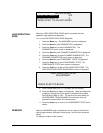
9. To check the status of the optical paper sensors:
a) Raise the Thickness Lever to enable an 8.5 X 11 sheet of paper to
be inserted into the Scanner.
b) Insert the sheet of paper centered on the Scanner and slowly push
the paper into the Scanner to check the INPUT, REGISTER, and
EXIT sensors.
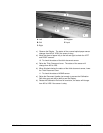
The sensors are located underneath the top cover. The photo below
shows the location of each of the sensors on the Document Feed Tray.