


XEROX WIDE FORMAT COPY SYSTEM Main Menu • 131
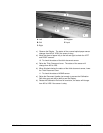
Select the CALIBRATION MOTOR option to set the calibration zone
motor.
To run the CALIBRATION MOTOR diagnostic:
1. Press the Menu key. The MAIN MENU screen is displayed.
2. Press the Next key until DIAGNOSTICS is highlighted.
3. Press the Enter key to select DIAGNOSTICS. The
DIAGNOSTICS menu screen is displayed.
4. Press the Next key until SCANNER DIAGNOSTICS is displayed.
5. Press the Enter key to select SCANNER DIAGNOSTICS. The
SCANNER DIAGNOSTICS menu screen is displayed.
6. Press the Next key until COMPONENT TESTS is highlighted.
7. Press the Enter key to select COMPONENT TESTS. The
COMPONENTS TESTS menu screen is displayed.
8. Press the Next key until CALIBRATION MOTOR is highlighted.
9. Press the Enter key to select CALIBRATION MOTOR. The
CALIBRATION MOTOR screen is displayed.
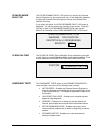
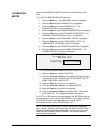
CALIBRATION
MOTOR
MOTOR: OFF
FUNCTION: GO TO HOME
10. Press the Previous or Next key to select FUNCTION.
11. Press the Enter key to select FUNCTION.
12. Press the Previous or Next key to highlight the desired function.
The choices are GO TO WIDTH, GO TO CALIBRATE, GO TO
HOME, FIND HOME, and ROTATE.
13. Press the Enter key to confirm your selection.
14. Press the Previous or Next key to highlight MOTOR.
15. Press the Enter key to confirm your selection.
16. Press the Previous or Next key to highlight ON. The choices
are ON and OFF. The requested operation will execute.
If a GO TO or FIND function has been selected, the MOTOR field will be
automatically set to OFF when the MOTOR field is once again selected.
If the ROTATE function has been selected, the motor will run
continuously until you set the MOTOR field to OFF.
NOTE: If the Scanner encounters a failure accessing the calibration
motor function, the fourth line of the display will read "FAILURE CODE:"
followed by a two-digit hexadecimal number. The fourth line may also
display NO RESPONSE FROM SCANNER if the Scanner does not
respond to the test request.
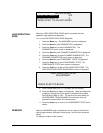
CALIBRATION
MOTOR