


13
2
Installing and
Connecting the NIC
This chapter describes how to install the NIC in your PC and connect it to an Ethernet or Fast
Ethernet network.
Before starting the installation procedure, you can gain some familiarity with the directory
structure and various files on the EtherCD supplied with the 3C990B NIC by reading
Appendix C, "EtherCD Content and Navigation."
Installation Overview
Installing the NIC involves your carrying out the following tasks:
■ Registering the product
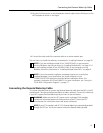
■ Installing the NIC in the PC
■ Connecting the NIC to the network
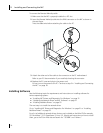
■ Installing the network driver
■ Enabling data encryption offloads (the 3C990B NIC is shipped with encryption
offloading disabled)
Safety Precautions
Observe the following safety precautions.
WARNING: Computers operate with voltages that can be lethal. Before
removing the cover, turn off the computer and unplug it. Disconnect all cables
that are connected to the main system unit. Remove jewelry from your hands
and wrists. Use insulated or nonconductive tools.
CAUTION: The NIC is packed in an antistatic container to protect it during
shipment. Do not touch the components or any metal parts on the NIC, except
for the backplate. To avoid damaging the NIC or the computer, reduce static
electricity on your body by wearing an electrostatic discharge wrist strap
attached to the chassis or by touching an unpainted metal part of the chassis
before unplugging the computer and before handling the NIC.
CAUTION: Install the NIC in a PCI slot that conforms to PCI 2.1 or higher
specifications. Do not attempt to install the NIC in an ISA or EISA slot. Doing so
may damage the NIC and the computer.
WARNING: Make sure that the computer power cord is unplugged. Only
properly trained and authorized personnel should perform service. Contact the
computer manufacturer for information about safe service techniques.