


Touch Panel Accessories
22
1200V Modero Video Touch Panels
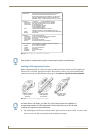
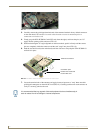
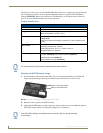
5. Grip the sides of the new CF memory card and firmly insert it into the slot opening (with the arrow
facing towards the pins) until the contact pins are completely inside the flash card and it is then
securely attached to the pin sockets.
6. To complete the upgrade process, close and resecure the panel enclosure using the procedures in the
following step.
Step 4: Close and Resecure the NXT Panel Enclosure
1.
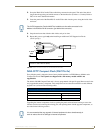
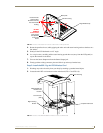
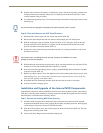
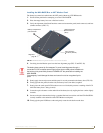
Obtain the I/O connector plate and slide it back into position (FIG. 20).
2. Resecure the Stereo Output nut back onto the new Stereo Output jack onto the I/O plate.
3. With the components securely installed, tilt the LCD back to a 45° and gently slide-on the outer
housing (towards the LCD) until the it is aligned over the installation holes and the tilt bracket
prevents any further forward movement (FIG. 16).
4. Gently press down on the housing (toward the base) until it is securely positioned over the circuit
board and covers base.
5. While holding the outer housing and base plate in place, turn the panel back over until the LCD lies
facedown on a soft cloth and the under-side of the base is exposed.
6. Insert and secure the eight Housing Screws (using a grounded Phillips-head screwdriver) into their
respective locations (FIG. 16).
7. Replace any adhesive plastic "feet" that might have been removed during the removal process of the
outer housing. These "feet" must be placed back onto their original locations so they can fit into
their provided openings on the Battery Base.
8. Grasp both the LCD and housing and then rotate the entire unit back onto a flat surface.
9. Insert all connectors and apply power.
Installation and Upgrade of the Internal NXD Components
Upgrading the components within a WallMount panel involves removing the rear plastic outer housing
(back box), removing and/or installing an existing component, and then placing the back box back onto
the NXD panel, as described in the following sections.
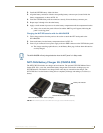
Step 1: Remove the existing NXD Outer Housing
1.
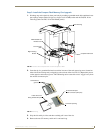
Carefully detach all connectors from the side of the touch panel and remove the front magnetic
faceplate from the NXD unit by firmly gripping the faceplate and pulling outwards, while applying
a small amount of pressure to remove it from the main unit.
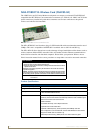
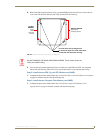
2. Place the LCD facedown onto a soft cloth to expose the under-side of the unit (FIG. 22). This step
helps prevent scratching of the LCD.
3. Unscrew the Stereo Output nut from the Stereo Output jack.
Any new internal card upgrade is detected by the panel only after power is cycled.
Use caution when re-installing the outer housing. Improper re-installation can cause
damage to the internal speakers.