


CHAPTER 6 TROUBLESHOOTING
6-52
10. INSPECTION MODE
10.1 Test Print Mode
The printer incorporates various test print modes.
Select the test mode you want to use following the steps below;
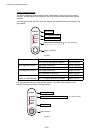
(1) Turn off the power switch of the printer and check that the front cover is closed.
(2) Turn on the power switch while holding down the control panel button. Press the button
until the Drum LED comes on.
The Drum LED illuminates to indicate that the printer enters into the test print mode.
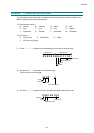
(3) If you want to execute the test print, release and then press the button again when the
Drum LED comes on.
If you want to execute another option, hold down the button to select it as shown in the
table below. Release and then press the button to execute the selected option.
LED Type of mode Function
Drum Test Sample Page The printer prints a test sample page. The
printer returns to the ready status after printing.
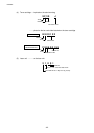
Ready Print Configuration &
Print Fonts I
(HL-1240/1250/1270N
only)
The printer prints the current configuration of
the printer and a list of the internal fonts. The
printer returns to the ready status after printing.
Alarm Factory Reset The printer is restored to the factory setting
and permanent fonts and macros are cleared.
The printer returns to the ready status after
printing.
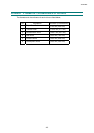
Data Hex Dump Print
(HL-1240/1250/1270N
only)
The printer can print data as hexadecimal
values so that you can check data errors and
problems. To exit from this mode, you have to
turn off the printer.
For the demo printer
Once you have sent any data from a PC to a demo printer to print, the demo printer turns into a
normal printer. Follow the procedures below to return it to being a demo printer;
<Sending the print file using the Brownie utility>
(1) Download the
Brownie
utility and the PRN file for your language from the Printer Utility
DB of Lotus Notes and install the Brownie software onto your PC.
(2) Open the Brownie utility and select the printer you want to return to being a demo printer.
(3) Open Explorer and find the PRN file you have downloaded in step 1), then drag the file
onto the Brownie window.
(4) Once the Brownie utility has finished sending the PRN file, turn the printer power off and
then turn it on again.
(5) Press the panel button, the demo page printing starts.