


Configuring Wireless Networks
Configuring Captive Portal
Cisco RV130/RV130W Wireless Multifunction VPN Router Administration Guide 78
4
Creating Captive Portal Profiles
To create a captive portal profile:
STEP 1 Choose Wireless > Captive Portal > Portal Profile. In the Portal Profile Table
section, click Add Row. To modify the portal profile provided on the device, check
the Default_Portal_Profile box and click Edit.
STEP 2 Enter a name for your Captive Portal profile.
STEP 3 Choose if you want to use the profile to authenticate guest users or users on your
network.
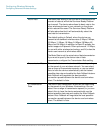
STEP 4 To redirect users to a URL after authentication, enable Auto Redirect URL, and
enter a fully qualified domain name or IP address in the Redirect URL field. For
example, include http:// in the URL.
STEP 5 In the Session Timeout field, specify the number of minutes that the device will
keep an authentication session open with the associated wireless client. The
default timeout is 60 minutes.
STEP 6 Select a font color for the text that you want to display on the page.
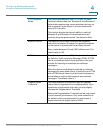
STEP 7 Specify the text that you want to display, such as the name of your organization,
the label text for username and password fields, and the label on the Login button.
STEP 8 Enter standard Copyright text associated with your company.
STEP 9 In the Error 1 and Error 2 fields, enter the error messages that you want to display
to clients when login fails and when the maximum number of connections is
exceeded.
STEP 10 To use a check box to allow users to accept terms of use before they continue,
enable Agreement. The text in the Agreement Text field will be displayed as the
label for the checkbox.
STEP 11 Enter the acceptance terms that you want to display to users in the Acceptance
Use Policy field.
STEP 12 In the Upload Files section, choose files to upload your company logo and
background files in keeping with your company’s branding guidelines. Save your
profile.
To preview this profile, choose Captive Portal > Portal Page Preview, and select
the profile from the Portal Profile drop-down list.