


Configuring the Firewall
Configuring Port Forwarding
Cisco RV130/130W Wireless Multifunction VPN Router Administration Guide 96
5
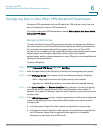
Configuring Port Range Forwarding
To add a port range forwarding rule:
STEP 1 Choose Firewall > Port Range Forwarding.
STEP 2 In the Application field, enter the name of the application for which to configure
port forwarding.
STEP 3 In the External Port field, specify the port number that will trigger this rule when a
connection request from outgoing traffic is made.
STEP 4 In the Start field, specify the port number that begins the range of ports to
forward.
STEP 5 In the End field, specify the port number that ends the range of ports to forward.
STEP 6 In the Interface drop-down menu, choose Both (Ethernet & 3G), Ethernet, or 3G.
STEP 7 From the Protocol drop-down menu, choose a protocol (TCP, UDP, or TCP &
UDP).
STEP 8 In the IP Address field, enter the IP address of the host on the LAN side to which
the specific IP traffic will be forwarded.
STEP 9 In the Enable field, check the Enable box to enable the rule.
STEP 10 Click Save.
Configuring Port Range Triggering
Port triggering allows devices on the LAN or DMZ to request one or more ports to
be forwarded to them. Port triggering waits for an outbound request from the LAN/
DMZ on one of the defined outgoing ports, and then opens an incoming port for
that specified type of traffic.
Port triggering is a form of dynamic port forwarding while an application is
transmitting data over the opened outgoing or incoming ports. Port triggering
opens an incoming port for a specific type of traffic on a defined outgoing port.
Port triggering is more flexible than static port forwarding (available when
configuring firewall rules) because a rule does not have to reference a specific
LAN IP or IP range. Ports are also not left open when not in use, which provides a
level of security that port forwarding does not offer.