


Chapter 5 Connecting the Management Interfaces and Performing Initial System Configuration
Connecting the Local Console
Cisco SCE 1000 2xGBE Installation and Configuration Guide
5-2 OL-7821-05
Make sure that the terminal configuration is as follows:
• 9600 baud
• 8 data bits
• No Parity
• 1 stop bits
• No flow control
The above SCE 1000 port parameters are fixed and are not configurable.
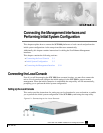
To set up the local console, complete the following steps:
Step 1 Plug the RS-232 serial cable provided with the SCE 1000 into the CON port on the front panel of
the SCE 1000.
Make sure that you push on the RJ-45 connector (attached to the RS-232 serial cable) until you
hear a “click”, which indicates that the connector is fully inserted and secured in the receptacle.
Gently pull on the plug to confirm whether the plug is locked into the socket.
Step 2 Connect the other end of the serial cable (with an attached DB-9 connector) to the VT100
compatible local (serial) terminal.
Step 3 Make sure the local terminal is configured as a VT-100 terminal, according to the fixed SCE 1000
CON port parameters.
Step 4 Press Enter several times until the Cisco logo appears on the local terminal and the setup
configuration dialog is entered.
--- System Configuration Dialog ---
At any point you may enter a question mark ‘?’ followed by ‘Enter’ for help.
Use ctrl-C to abort configuration dialog at any prompt.
Use ctrl-Z to jump to the end of the configuration dialog at any prompt.
Default settings are in square brackets ‘[]’.
Would you like to continue with the System Configuration Dialog? [yes/no]: y
Step 5 Type y and press Enter.
The system configuration dialog begins.