


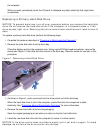
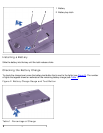

6. Gently push the drive carrier into the drive bay until the carrier door is flush with the computer case.
7. Push down on the driver carrier until it snaps into place.
8. Replace the screw you removed in step 2. Be careful not to overtighten the screw.
If you have installed a new hard-disk drive, follow the directions that came with the drive to partition and
logically format the drive and to create a suspend-to-disk (S2D) partition.
NOTICE: Hard-disk drives are extremely fragile and must be handled carefully to avoid
damage. Follow these guidelines:
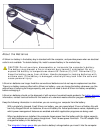
The primary hard-disk drive is installed in a metal carrier to protect the drive and
make installation easier. When you remove and install hard-disk drives, handle the
drive carrier, not the drive itself.
Never press down on the top of the drive.
Do not drop the drive. Even a slight jar or bump can damage the drive heads and
spinning plates, thus rendering the drive inoperable.
CAUTION: The primary hard-disk drive may be hot to the touch under extreme
environmental conditions. If the drive is hot, allow it to cool before you replace it.
Preparing a New Primary Drive
Every primary hard-disk drive must be physically formatted, partitioned, and logically formatted before it can
be used to store data. Every primary hard-disk drive from Dell is physically formatted before it is sent to you.
Use the program(s) provided by your operating system to partition and logically format the hard-disk drive.
Removing or Installing Memory Modules
NOTICE: Your computer only supports 100-megahertz (MHz) synchronous dynamic
random-access memory (SDRAM) modules. It does not support extended-data out (EDO)
memory modules.
NOTICE: Do not install memory modules while the computer is in suspend, standby, or
suspend-to-disk mode.
NOTICE: Ground yourself by touching an unpainted metal surface of a connector on the
back of the computer. While you work, periodically touch the connector to dissipate any
static electricity that might harm internal components.
To remove or install memory modules, perform the following steps:
1. Complete the tasks as described in "Preparing to Work Inside the Computer
."
2. Close the display, and turn the computer upside down.
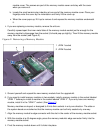
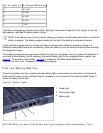
3. Remove the memory module cover:
a. Using a small Phillips-head screwdriver, remove the two screws located on the memory