


Installing System Components 97
Installing a Cabled Hard Drive
CAUTION: Many repairs may only be done by a certified service technician.
You should only perform troubleshooting and simple repairs as authorized in
your product documentation, or as directed by the online or telephone service
and support team. Damage due to servicing that is not authorized by Dell is not
covered by your warranty. Read and follow the safety instructions that came
with the product.
1
Turn off the system and attached peripherals, and disconnect the system
from the electrical outlet and from the peripherals.
2
Open the system. See "Opening the System" on page 85.
3
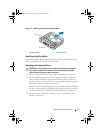
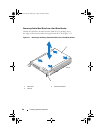
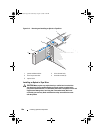
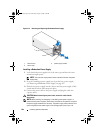
To remove the existing hard-drive bracket, press the blue tabs on each side
of the bracket toward each other and slide the bracket up and out of the
system. See Figure 3-11
.
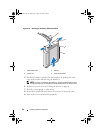
4
Snap the hard-drive bracket on to the hard drive. See Figure 3-11.
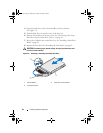
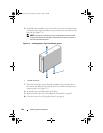
5
Slide the hard drive into the drive bay until it snaps into place.
6
Connect the power/data cable to the hard drive.
NOTE: If connecting to the integrated SATA controller (SATA hard
drives only), connect the SATA data cable to the SATA_A connector on
the system board. See Figure 6-1.
NOTE: If connecting to a SAS RAID controller card (SAS or SATA hard
drives), connect the data cable to the connector on the card. For information
on installing a SAS controller card, see "Installing an Expansion Card" on
page 115.
7
Replace the system cover. See "Closing the System" on page 86.
8
Place the system upright on a flat surface.
9
Reattach any peripherals and connect the system to an electrical outlet.
10
Enter the System Setup program and ensure that the hard drive’s
controller is enabled. See "Entering the System Setup Program" on
page 58.
11
Exit the System Setup program and reboot the system.
See the documentation that came with the hard drive for instructions on
installing any software required for drive operation.
book.book Page 97 Wednesday, August 19, 2009 4:40 PM