


Chapter 3. Service procedures
Personal ESD requirements ............................3-1
Tools and files overview ..............................3-1
Using the css.snap script .............................3-3
Switch supervisor self-test .............................3-4
Verification tests using Perspectives .........................3-4
Node supervisor verification ...........................3-4
Frame supervisor verification ...........................3-5
Switch supervisor verification ...........................3-5
Selecting appropriate switch clocks..........................3-6
Selecting the switch clock source .........................3-6
Determining the correct switch clock source .....................3-6
Removing and restoring switch resources .......................3-7
Removing a switch assembly from the active configuration ................3-7
Restoring a switch assembly to the active configuration .................3-8
Viewing switch partitions ............................3-8
Fencing nodes ...............................3-8
Unfencing nodes ..............................3-8
Service position procedures ............................3-9
Placing a switch assembly into service position ....................3-9
Replacing a switch assembly from service position ...................3-9
Resetting the clock and bootlist after servicing a node...................3-9
Installing firmware updates on SP nodes .......................3-10
Installing adapter microcode packages ........................3-10
Running diagnostics on a switch port ........................3-12
Personal ESD requirements
The processor uses FRUs that are known to be sensitive to electrostatic discharge (ESD). To prevent ESD
damage to FRUs or to prevent system failures, observe the following procedures:
v Keep the FRU in its original static-dissipative shipping container until the FRU is ready to be installed in
the system. Move the static-dissipative container near the location where the FRU is to be installed
(within ESD wrist strap distance). If the FRU must be put down for any reason, first place it in its
static-dissipative container or place it on the static-dissipative mat.
v Open only the covers that are necessary to complete the task. Any time a cover is open the service
representative and all people in the area must be ESD-safe. If power is switched on, or if removing or
exchanging any FRU, always use the ESD kit (part 93F2649).
1. Put on the ESD wrist strap.
2. Attach the ESD cable to the wrist strap.
3. Attach the ESD mat to the wrist strap, if required.
4. Attach the insulated clip to the ESD cable.
5. Attach the insulated clip to the frame holes labeled ESD. If the frame holes are not available, use a
grounding point on the frame.
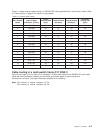
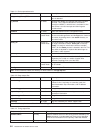
Tools and files overview
The following three tables provide an overview of the tools, setup files, and tuning files used in the service
procedures.
© Copyright IBM Corp. 1999, 2002 3-1