


Chapter 2
Hardware Installation
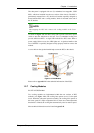
2.1 Introduction
This chapter gives detailed instructions on how to install the subsystem.
When installing the subsystem, it is necessary to mount the chassis into a
rack cabinet and to install hard drives and drive trays. Installation into a rack
or cabinet should occur before the hard drives or drive trays are installed
into the subsystem. Please confirm that you received all of the components
listed on the Unpacking List that came with the subsystem before
proceeding with the installation process.
CAUTION!
Please note that the installation instructions described in this manual
should be carefully followed to prevent any difficulties and damages to
your subsystem.
2.2 Installation Prerequisites
1. Static-free installation environment: The EonStor A16E-G2130-4
subsystem must be installed in a static-free environment to minimize
the possibility of electrostatic discharge (ESD) damage. (See Section
2.3.2)
2. Component check: Before installing the EonStor A16E-G2130-4
subsystem, you should first check to see that you have received all the
required components. (See Section 2.5) If any items appear damaged,
contact your vendor for a replacement.
3. Hard drives: Up to sixteen (16) SATA-I or SATA-II hard drives must
be purchased separately prior to installing the subsystem. (See Section
2.8)
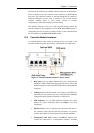
4. Cabling: The EonStor A16E-G2130-4 models all come with one (1)
audio-jack-to-DB9 cable to facilitate the connection of the COM1 serial
port of a management computer for terminal emulation management.
Two (2) power cords are provided for the power connections to the
power sources. For the compliance with listed emission standard, RJ-45
Introduction
2-1