


EonStor A16E-G2130-4 Installation and Hardware Reference Manual
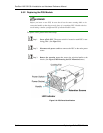
WARNING!
1. When a PSU is removed form the chassis, the cooling module is also removed
from the chassis.
2. It is recommended that the replacement procedure is completed in less than
five (5) minutes to prevent the subsystem from overheating.
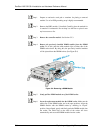
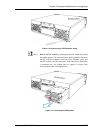
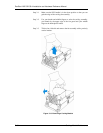
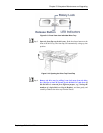
Step 5. Install the replacement module. Make sure the ejection handle is at
its up-most position so that the saddle notches on the sides of the
handle can snap onto the metal protrusions along the interior walls of
the PSU slot. Push the PSU into chassis, and when you feel the
contact resistance, push the handle downward to secure the module.
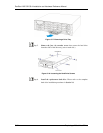
Step 6. Secure the PSU to the subsystem by fastening the retention screw
through the PSU ejection handle.
Step 7. Replace and Connect the power cord that connects the PSU module
to the mains.
Step 8. Power on the PSU module.
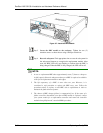
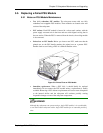
5.6. Cooling Module Maintenance
5.6.1 Notes on Cooling Module Maintenance
Redundant cooling modules: The subsystem is equipped with four (4) cooling
fans, two (2) within each PSU module. These cooling modules control the
internal operating temperature of the subsystem and therefore their working
integrity should be maintained at all times.
Although the cooling modules are fully redundant, it is not advisable to run the
EonStor subsystem with fans in a single PSU module for an extended period of
time. If the cooling fans in the only remaining PSU module fail, the subsystem
will quickly overheat.
Detecting a failed cooling module: If a cooling module fails, the LEDs located
at the back of the PSU module, an audible alarm, the firmware, the RAIDWatch
manager software, or the Configuration Client can notify you.
5-16 Cooling Module Maintenance