


M160 Internet Router Hardware Guide
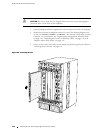
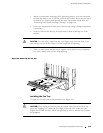
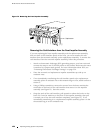
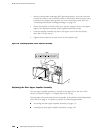
Figure 71: Removing the Front Impeller Assembly
1215
R
Captive screw
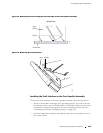
Removing the Craft Interface from the Front Impeller Assembly
If you are replacing the front impeller assembly and the replacement assembly
does not have a craft interface panel on the f ront, you must transfer the craft
interface from the removed assembly to the replacement assembly. To remove the
craft interface from the removed impeller assembly, follow this procedure:
1. A tt ach an electrostatic discharge (ESD) grounding strap to your bare wrist and
connect the strap to one of the ESD p oints on the chassis. Make sure the router
is attached to a pr oper earth ground. F or more information about ESD, see
“Preventing Electrostatic Discharge Damage” on page 226.
2. Place the removed and replacement impeller assemblies top side up on
antistatic mats.
3. If not immediately transferring the craft interface panel to the replacement
assembly, place an antistatic mat or electrostatic bag on a flat, stable surface to
receive it.
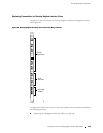
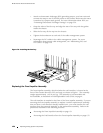
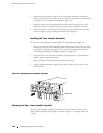
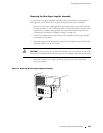
4. Using a Phillips screwdriver, remove the screws from the three semicircular
metal tabs on the back of the craft interface that secure it to the impeller
assembly (see Figure 72). Sav e the screws.
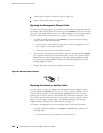
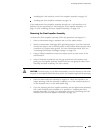
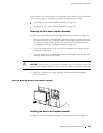
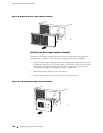
5. Grasp the ends of the craft interface, pull upward to release the hooks on the
back of it from the windows on the front of the impeller assembly, then pull
it toward you to free the craft interface completely (see Figure 73). If not
immediately transferring it to a replacement impeller assembly, place it in the
electrostatic bag or on the antistatic mat.
152 R eplacing Cooling System Components