


Management and Configuration
116 AXIS 5900 User’s Manual
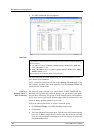
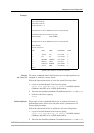
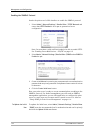
Generating a Self-
Signed Certificate
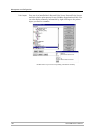
1. Select the Generate Self-Signed Certificate radio button and click Next.
2. Enter the data asked for:
• Country Name:
Example
: US
• State or Province Name:
Example
: California
• Locality Name:
Example
: Los Angeles
•Organization Name:
Example:
Printers Inc
• Organizational Unit Name:
Example:
Sales Dept
•Common Name*:
Example:
printserver2@company.com
• Current Date (yyyy/mm/dd):
Example:
2004/09/28
• Validity Duration (in days):
Example:
365
* Common Name denotes the name given to the print server in the network. If you do
not have a DNS server on your network, you must include the domain name, e. g.
xxx@company.com
3. Click Finish and the print server will generate a public/private key pair as
well as the self-signed certificate itself (this process will take a few minutes)
and store these data in the print server. When the certificate is generated,
the print server automatically loads it into your present browser session. The
browser reports the new state by changing into https mode.
4. In the browser’s Security Alert box, select View Certificate and Install
Certificate. Follow the instructions of the Install Certificate Wizard.
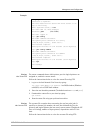
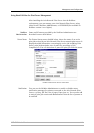
Generating a
Certificate Request
1. Select the Generate Certificate Request radio button and click Next.
2. Enter the data asked for:
• Country Name:
Example:
US
• State or Province Name:
Example:
California
• Locality Name:
Example:
Los Angeles
•Organization Name:
Example:
Printers Inc
• Organizational Unit Name:
Example:
Sales Dept
•Common Name*:
Example:
printserver2@company.com
• Current Date (yyyy/mm/dd):
Example:
2004/09/28
• Validity Duration (in days):
Example:
365
* Common Name denotes the name given to the print server in the network. If you do
not have a DNS server on your network, you must include the domain name, e. g.
xxx@company.com
3. Click Finish.
4. Now the print server will generate a public/private key pair and a PEM-
encoded Certificate Request, called cert.pem. Click Save, Save this file to
disk and Save.
5. Send this Certificate Request to your Certificate Authority for their
signature.
Importing a
Certificate
When you receive the PEM-encoded certificate from your Certificate
Authority, open the print server’s Web interface and select Admin |
Security Settings. Click Import and follow the instructions on the screen.