


Basic Installation (Wired & Wireless)
AXIS 5900 User’s Manual 13
Section 3 Basic Installation (Wired & Wireless)
Connecting the Hardware
1. Make sure that your printer is switched off and that the Power Adapter
external is disconnected
.
2. Locate the serial number, found on the underside label of the print server,
and write it down. You will need this number to set the IP address.
3. Connect the printer to the LPT1 or the LPT2 port on the Axis Network Print
Server using an appropriate printer cable.
4. Connect the Axis Network Print Server to the wired network using a twisted
pair category 5 cable, 10baseT and 100baseTX, or better.
Note:
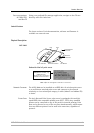
5. Switch on the printer and connect the Power Adapter to the Axis Network
Print Server. The Power indicator will light up. When the Network indicator
starts to flash, the Axis Network Print Server is successfully connected to the
network.
6. Wait 1 minute. Press the test button on the Axis Network Print Server to
print a test page. The test page includes a list of the most important
parameters, including the network speed, firmware version number and IP
address of the print server.
Notes:
You can install this Axis Network Print Server without using a network cable,
simply skip step 4 in these instructions.
The Axis Network Print Server uses high-speed Centronics Communication.
For use with older printers not supporting high speed, this function can be
disabled by using a standard Web browser. Please refer to “Management and
Configuration” on page 92, for more information.