


28-2 Riverstone Networks RS Switch Router User Guide Release 8.0
Configuring and Enabling RMON RMON Configuration
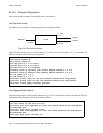
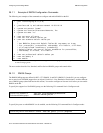
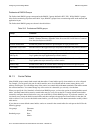
28.1.1 Example of RMON Configuration Commands
The following are examples of the commands to configure and enable RMON on the RS:
The next sections describe Lite, Standard, and Professional RMON groups and control tables.
28.1.2 RMON Groups
The RMON MIB groups are defined in RFCs 1757 (RMON 1) and 2021 (RMON 2). On the RS, you can configure
one or more levels of RMON support for a set of ports. Each level—Lite, Standard, or Professional—enables different
sets of RMON groups (described later in this section). You need to configure at least one level before you can enable
RMON on the RS.
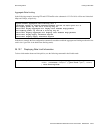
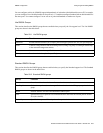
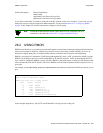
To specify the support level for RMON groups, use the following CLI command line in Configure mode:
To specify the ports on which RMON is to be enabled, use the following CLI command line in Configure mode:
1 : port flow-bridging et.5.(3-8)
*
!
2 : interface add ip en0 address-netmask 10.50.6.9/16
!
3 : system set contact "usama"
4 : system set location Riverstone Networks, Inc.
5 : system set name "rs"
!
6 : rmon set ports all-ports
7 : rmon set lite default-tables yes
8 : rmon set standard default-tables yes
!
! Set RMON Pro Group with Default Tables ON, cap memory at 4 meg
! Pro: protocolDir, protocolDist, addressMap, al/nl-Matrix, al/nl-Host,
! al/nl-matrixTopN. userHistory, probeConfig.
! Default Tables: one control row per dataSource for protocolDist,
! addressMap, al/nl-Host, al/nl-Matrix.
!
9 : rmon set professional default-tables yes
10 : rmon set memory 4
11 : rmon enable
7RFROOHFWOD\HUPDWUL[LQIRUPDWLRQSRUWPXVWEHFRQILJXUHGIRUIORZEULGJLQJPRGH%\GHIDXOWSRUWVRQWKH56RSHUDWH
LQDGGUHVVEULGJLQJPRGH
Specifies Lite, Standard, or
Professional RMON groups.
rmon set lite|standard|professional
default-tables yes|no
Specifies the ports on which RMON is enabled.
rmon set ports
<port list>
|allports