


Installing the LCD unit/FL inverter
To install the LCD unit/FL inverter, follow the steps below and refer to Figure 4-41 to
4-47.
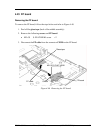
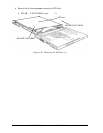
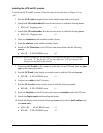
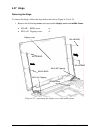
1. Pass the LCD cable through the hole of the middle frame and set it in place.
2. Install the LCD cable holder B to the slot and secure it with the following screw.
• M2.5×6S Tapping screw ×1
3. Install the LCD cable holder A to the slot and secure it with the following screw.
• M2.5×4S Tapping screw ×1
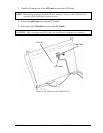
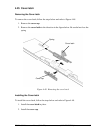
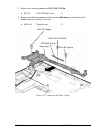
4. Stick two insulators to the middle assembly (front).
5. Stick the insulator to the middle assembly (back).
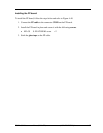
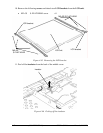
6. Install two LCD brackets to the LCD unit and secure them with the following
screws.
• M2×3S S-FLAT HEAD screw ×8
CAUTION: When installing the LCD bracket, do not mistake the left for the right and
vice versa. “L” for the left, “R” for the right and “UP” for the up of the
bracket are marked on the bracket.
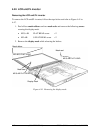
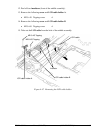
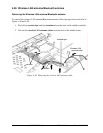
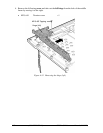
7. Connect the LCD cable to the connector on the back of the LCD unit. Stick the glass
tape on the connected portion.
8. Seat the LCD unit to the display cover and secure it with the following screws.
• M2×4B S-FLAT HEAD screw ×2
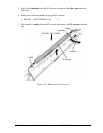
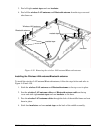
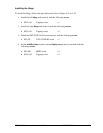
6. Connect two cables to the FL inverter.
7. Seat the FL inverter to the slot and secure it with the following screw.
• M2×4B S-FLAT HEAD screw ×1
8. Stick one insulator on the FL inverter and insert one insulator under the LCD unit.
9. Install the display mask while hooking the latches.
10. Secure the display mask with the following screws and stick two mask rubbers and
two mask seals.
• M2.5×4B FLAT HEAD screw ×2
• M2×4B S-FLAT HEAD screw ×2
4-64 [CONFIDENTIAL] TECRA S3 Maintenance Manual (960-532)