


16 Security
170 Xerox WorkCentre 7232/7242 System Administration Guide
Setting PDF/XPS Signature
Installation Overview
Use the following procedure to attach a PDF/XPS signature to a PDF/XPS document.
NOTE: XPS stands for XML Paper Specification.
Configuration of the Machine
Import a certificate into the machine and configure the PDF/XPS signature settings
on CentreWare Internet Services. By factory default, no certificate is registered in
the machine.
Before you register a certificate, the following configuration is required: Securing
HTTP Communication with Encryption on page 165.
Configuration of a Computer
Make sure that the root certificate for the scan file signature certificate is registered
in the destination computer.
Configuration of the Machine
To configure the PDF/XPS signature settings, first secure HTTP communication, and
then import a certificate into the machine and use it as a certificate for scan file
signature.
NOTE: For information on the settings for securing HTTP communication, refer to
Securing HTTP Communication with Encryption on page 165.
NOTE: For information on how to use CentreWare Internet Services, refer to
CentreWare Internet Services on page 47.
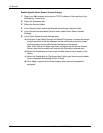
Importing a Certificate into the Machine
1. On CentreWare Internet Services, click the [Properties] tab.
2. Under [Description], make sure that [Machine’s E-mail Address] is set.
3. Expand the [Security] folder, and then click [Machine Digital Certificate
Management].
4. Click [Upload Signed Certificate].
5. Enter the password into [Password] and [Re-enter Password].
6. Enter the name of the file to be imported. Use the [Browse] button as necessary.
NOTE: A certificate cannot be imported into the machine if the same certificate has
already been registered in either [Local Device] or [Others]. In that case, delete the
existing certificate, and then import the new certificate.
7. Click [Import]. When prompted, enter your user ID and passcode, and then click
[OK].