


Updating System
Software
Advanced Printer Operations 4-7
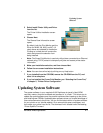
3 Select Install Printer Utility and Driver
from the list.
The Printer Utilities Installation screen
opens.
4 Choose Next.
The General User Information screen
opens.
By default, both the Print Monitor and the
Driver for Win95, 98, 2000, and NT 4.0
check boxes are selected for installation.
Clicking on a check box will remove the
check and prevent the selection from
being installed.
»Note:
The Crown Print Monitor is used only with printers connected to an Ethernet
network using TCP/IP protocol to transport print jobs and access printer status
information.
5 Make your installation selection, and then choose Next.
6 Follow the on-screen installation instructions.
»Note:
You can view online help by clicking on any Help button.
7 If you installed from the CD-ROM, remove the CD-ROM from the PC, and
store it in a safe place.
8 If you’ve installed the Crown Print Monitor, see “Selecting the Crown Port,”
in chapter 2, “Printer Driver Configuration.”
Updating System Software
The system software in your
magicolor
6100 DeskLaser is stored in flash ROM,
read-only memory that can be erased and rewritten to “in a flash.” This allows you to
update the system software over the parallel interface without opening up the printer
and installing new PROMs. Updated system software allows you to take advantage of
future enhancements to the printer. You can find the latest version of system software
for your printer on our Internet website. Go to www.minolta-qms.com/support, and
then select your printer from the list. The download link is located under the heading,
“Printer Specific Firmware.”