


Dual In-Line Memory
Modules
Options 5-15
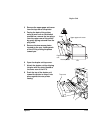
4 If you need to remove a DIMM
before installing one, remove it
as follows; otherwise skip to
step 5.
»Note:
If both DIMM connectors are
filled and you want to install more
memory, you must remove both
DIMMs and install one DIMM of a
greater memory capacity or install
two DIMMS of equal size.
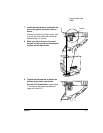
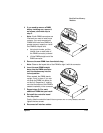
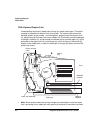
a Using both thumbs, pull the
latches (one on each side of
the DIMM connector) outward.
b Lift the DIMM straight out of the
DIMM connector.
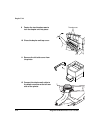
5 Remove the new DIMM from its antistatic bag.
»Note:
Observe the keyed side of the DIMM to align it with the connector.
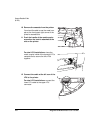
6 Insert the new DIMM straight
down into the DIMM connector
until the latches snap into the
locked position.
When seated, the DIMM stands
upright, firmly in place. If you can-
not snap the DIMM into place, do
not force it. Reposition it, making
sure that the bottom of the DIMM is
seated completely in the connector.
7 Repeat steps 5–6 for each
additional DIMM that you install.
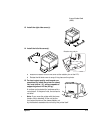
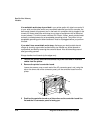
8 Reinstall the controller board
into the printer.
Gently slide the controller board into the printer until it is fully seated, and then
tighten the two screws.
9 Reconnect all interface cables.
IIIIIIIIIIIIIIIIIIIIIIIIIIIIIIIIIIIIIIIIIIIIIII IIIIIIIIIIIIIIIIIIIIIIIIIIIIIIIIIII IIIIIIIII
................................................ ........................ ..........
................................................ ........................ ..........
................................................ ........................ ..........
................................................ ........................ ..........
................................................ ........................ ..........
................................................ ........................ ..........
IIIIIIIIIIIIIIIIIIIIIIIIIIIIIIIIIIIIIIIIIIIIIII IIIIIIIIIIIIIIIIIIIIIIIIIIIIIIIIIII IIIIIIIII
................................................ ........................ ..........
................................................ ........................ ..........
................................................ ........................ ..........
................................................ ........................ ..........