


3 Hardware configuration
104
7
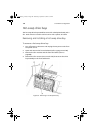
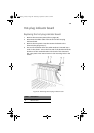
8 Remove the two plastic rivets and the plastic overlay from the
power distribution board.
9 Attach the plastic overlay to the new power distribution board
using the two plastic rivets.
10 Grasp the new power distribution board and overlay with the
power supply connectors facing the power supply bays.
11 Tilt the edge of the power distribution board in your hand about
30° and gently slide the other edge of the board into the four slots
in the power supply bays.
12 When the board is inserted all the way into the slots, tilt the board
down so the four mounting holes on the edge of the board are
aligned with the corresponding holes in the main chassis.
13 Tighten the four screws to secure the power distribution board to
the main chassis.
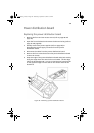
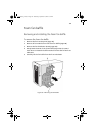
14 Install the power supplies.
15 Install the electronics bay (refer to page 49).
16 Connect the cables to the power distribution board and
mainboard.
17 Close the front subchassis and electronics bay.
18 Install the front and rear access covers (refer to page 46 and
page 45).
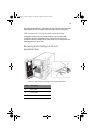
Label Description Label Description
A Power supply module B Screws
AA G900 ug - EN.book Page 104 Wednesday, September 25, 2002 5:23 PM