


Appendix A: System rack installation
150
Rack conversion procedures
This section describes the procedures to install the contents of the rack
conversion kit. Unless otherwise specified, all references to chassis
directions (top, bottom, left, right, front, and rear) refer to a chassis in
rack orientation when you are facing the front of the chassis.
Be sure to observe the safety and ESD precautions in the “Installation
precautions” on page 41.
Installation overview
Installing the contents of the rack conversion kit involves the following
steps:
• Removing the bottom panel
• Removing the left panel
• Removing the original tower bezel
• Removing the feet
• Installing the rack bezel
• Installing the bushings on the chassis
• Installing the handles and rails (see the note below)
Note: You also need the manual from the rack-mount rail kit to
complete this installation.
The following sections describe the above procedures in detail.
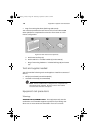
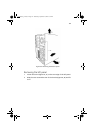
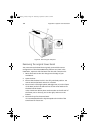
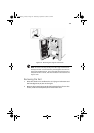
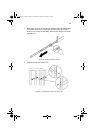
Removing the bottom panel
1 Orient the server so it is resting on its feet as shown in Figure 60.
2 Remove the two screws (Figure 60, A) located on the rear edge of
the bottom panel.
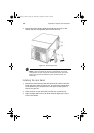
3 Slide the panel toward the rear of the chassis (Figure 60, B).
4 Using the orientation shown in Figure 60 as a reference, grasp the
bottom edge of the cover (Figure 60, C) and tilt it out. Then lift
the cover straight up (Figure 60, D) to free it from the tabs on the
chassis.
AA G900 ug - EN.book Page 150 Wednesday, September 25, 2002 5:23 PM