


CHAPTER 2 TCP/IP PRINTING
2-10
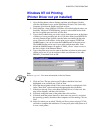
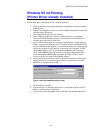
You may leave the other entries blank. Click on the OK button. The pipe should be
highlighted; if not click on it.
Click on the Create button to create the printer.
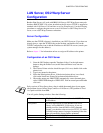
Open the LAN Services folder and execute the LAN Requester program:
1.
Select Definitions
2.
Select Aliases
3.
Select Printers
4.
Select Create. Enter the following:
Alias Should be same as the printer name
previously defined
Description Anything you want
Server name Name of OS/2 server
Spooler queue Name of printer as defined previously
Maximum number of users Leave blank unless you want to limit the
number of users
5.
Exit the LAN Requester program.
6.
You should now be able to print. To test the queue, type the following from
either the OS/2 command prompt or from a DOS workstation:
7.
COPY C:\CONFIG.SYS \\servername\alias
8.
Where servername is the name of the file server and alias is the alias name
that you specified during this configuration process. This should print the
CONFIG.SYS file on the printer. Note that if you selected a binary service
as the LPD printer name, the lines will be staggered; don't worry about this
because normal DOS, Windows, and OS/2 applications will print OK.
9.
The Brother Print Server will appear as a standard OS/2 printer to
application programs. To make the print server operate transparently with
DOS programs, execute the following command on each workstation:
10.
NET USE LPT1: \\servername\alias
11.
This will make the printer appear to the software as a printer that is directly
connected to the parallel port of the workstation.