


6-27
Using the Fax Functions
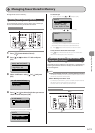
RX Page Footer
Specify whether to print the reception date, time, job ID,
and page number at the bottom of the page when printing
received faxes.
How to access the option
[ ](Menu) → <Fax Settings> → <RX Print Settings>
→ <RX Page Footer>
Settings
(Bold: Default setting)
Off Do not print the page footer.
On Print the page footer.
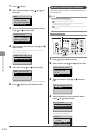
Continue Printing When Toner Is Low
Specify whether to continue printing received faxes when
the toner is nearly empty.
IMPORTANT
If <Continue Printing When Toner Is Low> is set to <On>
Note that the output may not be clear, as subtle details such as thin
lines and light colors may not be clearly reproduced, due to a small
amount of toner remaining inside the toner cartridge. Plus, faxes
are deleted once they have been printed.
How to access the option
[ ] (Menu) → <Fax Settings> → <RX Print Settings>
→ <Continue Printing When Toner Is Low>
Settings
(Bold: Default setting)
Off
The machine does not continue printing received
faxes.
On The machine continues printing received faxes.
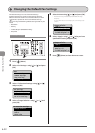
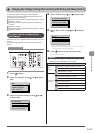
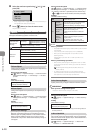
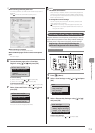
The steps to take for configuring the
system settings
Follow the steps in the procedure below to configure the
system settings.
The procedure describes the steps to change the “TX Start
Speed” setting.
Menu
OK
Keys to be used for this operation
1 Press [ ] (Menu).
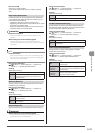
2 Select <System Settings> using [ ] or [ ] and
press [OK].
Menu
USB Direct Print Se
...
Printer Settings
Adjustment/Maintena...
System Settings
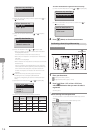
3 Select <Communication Management Settings>
using [ ] or [ ] and press [OK].
System Settings
Device Information
...
Dept. ID Management
...
Security Settings
Communication Manage
4 Select <Fax Settings> using [ ] or [ ] and press
[OK].
Communication Mgt. Set
Fax Settings
Memory Lock Settings
5 Select <TX Start Speed> using [ ] or [ ] and
press [OK].
Fax Settings
TX Start Speed
RX Start Speed