


7-5
Using the Scan Functions
NOTE
When scanning is complete
The scans are saved in the appropriate folder.
When additional pages can be scanned on the platen
glass
Proceed to step 3..
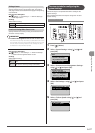
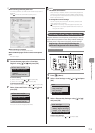
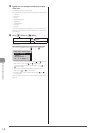
3 To scan the next page, select <Scan Next
Original> using [ ] or [ ] and press [OK].
Select Next Action
<Scan Next Original>
<Store and Finish>
<Cancel>
Confirm Destination
To cancel scanning
(1) Select <Cancel> using [ ] or [ ] and press [OK].
(2) Select <Yes> using [ ] or [ ] and press [OK].
To check the destination
Select <Confirm Destination> using [ ] or [ ] and press [OK].
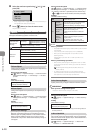
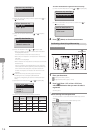
4 Select <Store and Finish> using [ ] or [ ] and
press [OK].
Select Next Action
<Scan Next Original>
<Store and Finish>
<Cancel>
Confirm Destination
The scans are saved in the appropriate folder.
NOTE
The default save location:
Once scanning is complete, a folder is automatically displayed to
which the scanned images are saved. By default, a folder bearing
the scanning date is created inside the [Pictures] (or [My Pictures])
folder in [My Documents].
To change the scan settings:
You can re-specify the save location, file format, resolution, and
other settings from a computer.
e-Manual→Scanning→Scanning Paper Documents and Saving
Them to a Computer (USB & Network Connection)→Using the
MF Toolbox
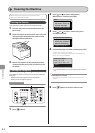
Saving Scanned Documents to USB
Memory Device
You can save scanned documents to USB memory device
inserted in the USB port.
This section describes the basic procedure.
IMPORTANT
The USB memory device port on the machine
• The port supports USB 1.1.
• Do not insert anything other than USB memory device.
Supported file systems and memory capacity
Supported file systems and memory capacity include the following.
You can have your USB memory device formatted with one of the
following file systems on your computer.
• FAT16: up to 2 GB
• FAT32: up to 32GB
For details, see “Scanning” in the e-Manual.
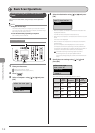
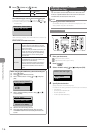
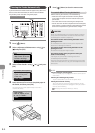
OK
SCAN
Start
Keys to be used for this operation
1 Insert a USB memory device to the USB port.
The machine will begin to read the device when USB memory is
inserted. Do not touch or remove the device from the port.
2 Place your document.
“Placing Documents” (→P.2-4)
“Supported Document Types” (→P.2-2)
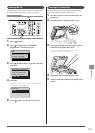
3 Press [ ].
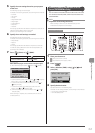
4 Select <Memory Media> using [ ] or [ ] and
press [OK].
Select the scan type.
Computer
Remote Scanner
Memory Media
5 Specify the scan settings based on your purpose
of the scan.
The following settings can be changed.
For details on the setting procedure, see “Scanning” in the e-Manual.
• Scan Size
• File Format
• Density
• Original Orientation
• Original Type
• 2-Sided Original (MF8380Cdw Only)
• Sharpness
• Data Size
The settings specified here are effective only for the current task. To
apply these settings to all tasks, see “Scanning” in the e-Manual.