


5-6
Registering Destinations in the Address Book
You can perform the following tasks.
• Registering coded dial codes
• Editing coded dial codes
• Deleting coded dial codes
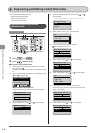
Registering and Editing from the
Operation Panel
OK
Address Book FAX SCAN Tone, Numeric keys
Back
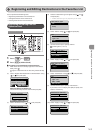
Keys to be used for this operation
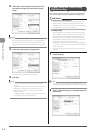
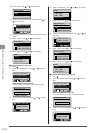
1 Press [ ] or [ ].
2 Press [ ] (Address Book).
● To register a new coded dial code
(1) When destinations are already registered in the coded
dial code, press [ ].
To register a destination for the first time, proceed to Step
(2).
(2) Select <Register New Destination to Address Book> using
[ ] or [ ] and press [OK].
Register New Destina
Edit Address Book
Address Book Details
All Fav.
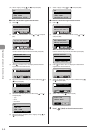
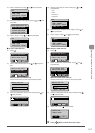
When the address book PIN is set
Use the numeric keys to enter the PIN and press [OK].
Address Book PIN
(Apply: Press OK)
*******
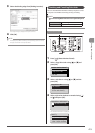
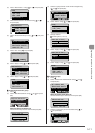
(3) Select <Coded Dial> using [ ] or [ ] and press [OK].
Register Location
Coded Dial
Favorites
(4) Select the destination type to register using [ ] or [ ]
and press [OK].
* Available destination types vary depending on the model.
Destination Type
Fax
E-Mail
Group
(5) Select <Name> using [ ] or [ ] and press [OK].
Fax
<Apply>
Type: Fax
Name:
Destination:
(6) Use the numeric keys to specify <Name>.
“Entering Text” (→P.1-11)
Name (Max 16 char.)
CANON
<Apply>
Entry Mode: A
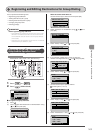
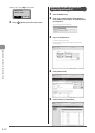
(7) Select <Apply> using [ ] or [ ] and press [OK].
Name (Max 16 char.)
CANON
<Apply>
Entry Mode: A
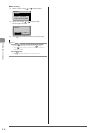
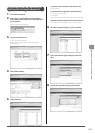
(8) Select <Destination> using [ ] or [ ] and press [OK].
Fax
<Apply>
Type: Fax
Name: CANON
Destination:
(9) Use the numeric keys to specify <Destination>.
If you select <Fax> in Step 4, press [OK] to specify <Set
Details> if necessary.
Destination (Max 40)
0123456789
<Apply>
Set Details
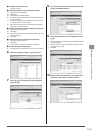
(10) Select <Apply> using [ ] or [ ] and press [OK].
Destination (Max 40)
0123456789
<Apply>
Set Details
Registering and Editing Coded Dial Codes