


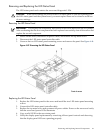

Removing and Replacing the LED Status Panel
The LED status panel card contains the server and diagnostic LEDs.
CAUTION: Some server settings are saved to the LED status panel. If you are replacing both
the LED status panel and the system board, you must replace them one at a time to avoid loss
of server settings.
Removing the LED Status Panel
IMPORTANT: First replace one component, then power on the server and boot to the EFI prompt.
After confirming that the first component has been replaced successfully, shut off the server and
replace the second component.
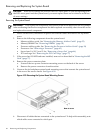
1. Power off the server, disconnect all power cables, and remove the top metal cover.
2. Disconnect the LED status panel controller cable.
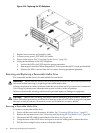
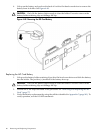
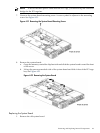
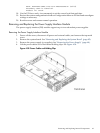
3. Unscrew the two LED status panel mounting screws and remove the panel. See Figure 4-49.
Figure 4-49 Removing the LED Status Panel
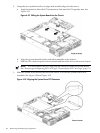
Replacing the LED Status Panel
1. Replace the LED status panel in the server and install the two LED status panel mounting
screws.
2. Connect the LED status panel controller cable.
3. Replace the top metal cover and reconnect all power cables. Power on the server and verify
that the server and power LEDs illuminate.
4. Copy a valid UUID to the new status panel.
5. Verify the display panel replacement by exercising all front panel controls and observing
that the display panel LEDs are operating properly.
Removing and Replacing Internal Components 81