


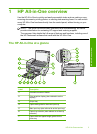
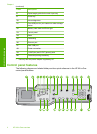
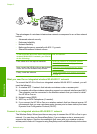

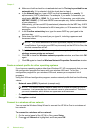

Label Name and Description
1 Display: Displays menus, photos, and messages. The angle of the display can be changed for
better viewing. Place a finger in the indented area to the left of the display and then pull up.
2 Attention light: Indicates a problem occurred. See the display for more information.
3 Back: Returns to the previous screen on the display.
4 Directional pad: Allows you to navigate through menu options by pressing the up, down, left,
or right arrow buttons.
If you are zooming in on a photo, you can also use the arrow buttons to pan around the photo
and select a different area to print.
5 OK: Selects a menu setting, value, or photo on the display.
6 Zoom out - (magnifying glass icon): Zooms out to show more of a photo. If you press this button
when a photo is shown on the display at 100%, the Fit to Page feature is applied to the photo
automatically.
7 Zoom in + (magnifying glass icon): Zooms in to enlarge the image on the display. You can also
use this button together with the arrows on the directional pad to adjust the crop box for
printing.
8 Photo Menu: Launches the Photosmart Express menu for printing, saving, editing, and
sharing photos.
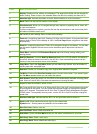
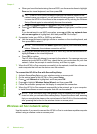
9 Red Eye Removal: Turns the Red Eye Removal feature On or Off. By default, this feature is
turned off. When the feature is turned on, the HP All-in-One automatically corrects red eye
coloring in the photo currently shown on the display.
10 Copy Menu: Opens the Copy Menu where you can select copy options, such as number of
copies, paper size, and paper type.
11 Reprints: Enables you to make a copy of an original photo placed on the glass.
12 Fax Menu: Presents the Enter Fax Number screen to enter a fax number. If you press it again,
the Fax Menu appears where you can select fax options.
13 Auto Answer: When this button is lit, the HP All-in-One automatically answers incoming phone
calls. When off, the HP All-in-One does not answer any incoming fax calls.
14 Keypad: Enters fax numbers, values, or text.
15 On: Turns the HP All-in-One on or off. When the HP All-in-One is off, a minimal amount of power
is still supplied to the device. You can further reduce power supply by holding down the On
button for 3 seconds. This places the HP All-in-One in Federal Energy Management Program
(FEMP) mode. To completely remove power, turn the HP All-in-One off, and then unplug the
power cord.
16 Wireless radio light: Indicates that the 802.11 b and g wireless radio is turned on.
17 Space and #: Enter spaces and pound signs for fax-related tasks.
Symbols and *: Enter symbols and asterisks for fax-related tasks.
18 Start Fax Color: Starts a color fax.
19 Start Fax Black: Starts a black-and-white fax.
20 Scan Menu: Opens the Scan Menu where you can select a destination for your scan.
21 Start Copy Color: Starts a color copy.
22 Start Copy Black: Starts a black-and-white copy.
Control panel features 5
HP All-in-One overview