140 Upgrading Boardset Components
Midplane: Removing and Installing
Removing the Midplane
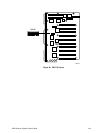
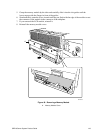
See Figure 47.
CAUTION
Disconnect EVERYTHING from the midplane before trying to remove it.
Failure to do so can result in serious damage to the midplane and any
components still connected to the midplane.
1. Observe the safety and ESD precautions at the beginning of this chapter.
2. Remove the power supplies (see “Hot-Swapping Power Supplies” on page 88).
3. Remove the profusion carrier tray (see “Profusion Carrier Tray” on page 104).
4. Remove the I/O tray (see “I/O Tray” on page 114).
5. Remove the three screws that attach the upper midplane support bracket to the chassis.
CAUTION
As you remove the upper bracket, make sure the edge of the bracket does not
gouge or slice the ribbon cables that are routed between the bracket and the
chassis wall.
6. Remove the upper bracket by pulling it straight up, out of the chassis.
7. Remove the four screws that attach the lower bracket/midplane assembly to the chassis.
8. Remove the bracket/midplane assembly by pulling it straight up, out of the chassis.
9. To remove the midplane from its support bracket, remove and save the seven screws that
attach the two parts.
10. Place the midplane on a nonconductive, static-free surface, or store it in an antistatic protective
wrapper.
Installing the Midplane
See Figure 47.
1. Remove the midplane from its protective wrapper.
2. Position the midplane on its support bracket and insert the screws loosely into the threaded
standoffs.
3. Make sure the midplane is properly positioned, then tighten all screws firmly
(8.0 inch-pounds).
4. Install the midplane/support bracket assembly in the chassis, then secure it with the four
screws you removed earlier.


