


4.3 Error Messages
4-7
4.3 Error Messages
The following table lists errors and maintenance messages that you can be dealt with by
yourself. If Call service appears, turn off the printer, disconnect the power cord, and
contact your Kyocera Mita dealer.
Some errors cause the alarm sound to sound. To stop the alarm sound, press the CANCEL
key to stop the alarm sound.
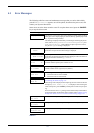
Message Corrective Action
Add paper MPTray
The paper has run out in the paper source displayed. Supply paper according
to the paper source displayed (paper cassettes, MP tray, optional paper feed-
ers, or optional envelope feeder).
This message is displayed alternately with messages indicating the printer
status, such as, Ready, Please wait, Processing, Waiting, and
Form Feed Time Out. If the number of copies to print is 2 or more,
only the Add paper message is displayed.
Call service
F###:
F### represents a controller error (#=0, 1, 2, ...). Call for service. The
printer does not operate when this message is displayed.
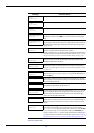
Call service
###
#
:0123456
#### represents a mechanical error (#=0, 1, 2, ...). Call for service. The
printer does not operate when this message is displayed. The total number of
pages printed is also indicated, e.g. 0123456.
Call service
Person F0
This message means an error in data communications between the printer
controller and the operator panel. Call for service.
Cassette #
not loaded
The corresponding paper cassette is not installed. Install the cassette. The
cassette number can be 1 (topmost) to 4 (bottom).
Check waste
toner box
This message warns following two cases. Install the new waste toner box.
• The waste toner box is not installed.
• The waste toner box is almost full.
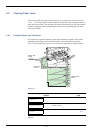
Clean printer
Press GO
Please clean the inside of the printer. See Chapter 5 Maintenance, section
5.3 Cleaning the Printer on page 5-11.
This message will be displayed when replacing the toner container after the
message Replace toner C, M, Y, K is displayed. After cleaning the
inside of the printer, press the GO key and the printer will be ready for print-
ing.
If Auto Continue is set to On, printing will be automatically resumed after a
preset period of time. For details on Auto Continue, refer to Chapter 3 Using
the Operator Panel, section 3.13.8 Auto Continue Setting on page 3-97.
Close duplexer
rear unit
The rear unit of the optional duplexer is open. Close the duplexer rear unit.
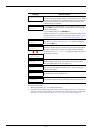
Close duplexer
top cover
The top cover of the optional duplexer is open. Close the duplexer top cover.
Close paper
transfer unit
The paper transfer unit is open. Close the paper transfer unit.
Table 4-3