


For example:
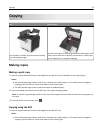
1 Load an original document faceup, short edge first into the ADF tray or facedown on the scanner glass.
Notes:
• Do not load postcards, photos, small items, transparencies, photo paper, or thin media (such as magazine
clippings) into the ADF tray. Place these items on the scanner glass.
• The ADF indicator light comes on when the paper is loaded properly.
2 If you are loading a document into the ADF tray, then adjust the paper guides.
3 From the home screen, navigate to:
Copy > Advanced Options > Custom Job > On >
> Copy It
Note: When the end of a set is reached, the scan screen appears.
4 Load the next document faceup, short edge first into the ADF tray or facedown on the scanner glass, and then touch
Scan from automatic feeder or Scan from flatbed.
Note: Change the scan job settings, if necessary.
5 If you have another document to scan, then repeat the previous step. Otherwise, touch Finish the job.
Placing information on copies
Placing a header or footer on pages
1 Load an original document faceup, short edge first into the ADF tray or facedown on the scanner glass.
Notes:
• Do not load postcards, photos, small items, transparencies, photo paper, or thin media (such as magazine
clippings) into the ADF tray. Place these items on the scanner glass.
• The ADF indicator light comes on when the paper is loaded properly.
2 If you are loading a document into the ADF, then adjust the paper guides.
3 From the home screen, navigate to:
Copy > Advanced Options > Header/Footer > select where you want to place the header or footer > select the type
of header or footer you want
4 Enter the required information depending on the header or footer you selected, and then touch Done.
5 Touch , and then press .
Placing an overlay message on each page
An overlay message can be placed on each page. The message choices are Urgent, Confidential, Copy, Custom, and
Draft.
1 Load an original document faceup, short edge first into the ADF tray or facedown on the scanner glass.
Copying 82