


20
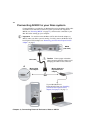
Chapter 4, Connecting External Devices to Matrox MXO2 Rack
¦NoteThis chapter details how to connect external devices to Matrox MXO2
Rack only. For another MXO2 product, see Chapter 3, “Connecting External
Devices to Matrox MXO2”, Chapter 5, “Connecting External Devices to Matrox
MXO2 LE”, or Chapter 6, “Connecting External Devices to Matrox MXO2
Mini.”
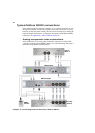
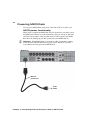
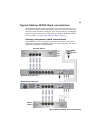
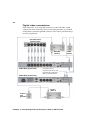
Available MXO2 Rack connections
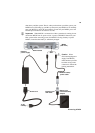
Matrox MXO2 Rack features a full compliment of professional inputs and
outputs, and allows you to connect multiple devices for up to five user-selectable
simultaneous video outputs.
MXO2 Rack video connections
• One HD HDMI input and one HD/SD HDMI output, both with up to eight
channels of embedded audio support. The HDMI input/output supports YUV
and RGB devices.
• One HD/SD SDI input and two HD/SDI outputs with up to eight channels of
embedded audio. Both SDI outputs simultaneously output the same video
and embedded audio.
• One HD/SD analog component input/output, one S-Video input/output, and
one composite input/output.
• One analog black burst reference input and loop-through output.
MXO2 Rack audio connections
• Four balanced analog XLR inputs (two stereo pairs).
• Eight balanced analog XLR outputs (four stereo pairs).
• Two AES/EBU stereo inputs/outputs.
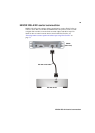
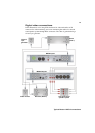
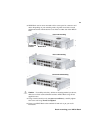
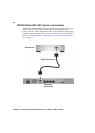
Rack mounting your MXO2 Rack
Use the supplied rackmount brackets to mount your Matrox MXO2 Rack to a
standard 19-inch rack. The rackmount brackets can be used to either front or rear
mount your MXO2 Rack. You can also mount MXO2 Rack so that it’s recessed
to allow more space for cables. MXO2 Rack takes up two vertical rack unit
spaces.
1 Unpack the two rackmount brackets and their eight mounting screws.
²Caution Use only the screws supplied with your MXO2 Rack to attach the
rackmount brackets to your MXO2 Rack. If you use screws that are larger or
longer than the ones supplied, you can damage your equipment.
2 Depending if you want to front or rear mount your MXO2 Rack, position the
rackmount brackets so that the bracket face is either towards the front
(connector side) or the back of your MXO2 Rack.