


76
Chapter 9, Using Matrox MXO2 with Supported Programs
Setting your capture settings
For frame-accurate capture using Final Cut Pro with Matrox MXO2, set the
capture settings as follows:
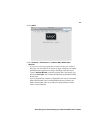
1 Open Final Cut Pro and choose File > Log and Capture.
2 In the Log and Capture window, click the Capture Settings tab.
3 From the Device Control menu, select a Matrox MXO2 device control
preset. To create or edit an MXO2 device control preset, see “Creating and
editing MXO2 device control presets” on page 72.
4 From the Capture/Input menu, select a Matrox MXO2 capture preset. To
create or edit an MXO2 capture preset, see “Creating and editing MXO2
capture presets” on page 71.
5 To set your audio capture settings, including which MXO2 audio input
channels you want to capture, click the
Clip Settings tab and specify your
settings in the
Audio section. For information on how to set your audio
channel settings for capture, see your Final Cut Pro documentation.
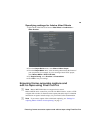
Setting your edit-to-tape settings
For frame-accurate edit-to-tape using Final Cut Pro with Matrox MXO2, set the
edit-to-tape settings as follows:
1 Open Final Cut Pro and choose File > Edit To Tape.
2 In the Edit To Tape window, click the Device Settings tab.
3 From the Device Control menu, select a Matrox MXO2 device control
preset. To create or edit an MXO2 device control preset, see “Creating and
editing MXO2 device control presets” on page 72.
4 If you’ll be performing an insert edit, from the Capture/Input menu, select
a Matrox MXO2 capture preset that is compatible with your tape. This is
required to allow you to preview your tape to see what the edit will look like
in Final Cut Pro’s
Edit to Tape window. To create or edit an MXO2 capture
preset, see “Creating and editing MXO2 capture presets” on page 71.
¦NoteTo preview video from your tape, you must connect video and audio
outputs from your recorder to the corresponding inputs on MXO2, and then
set the MXO2 A/V input settings accordingly (see “Specifying your A/V input
settings” on page 47).
5 To avoid having black frames recorded at the end of an insert edit, make sure
that
Editing, instead of Mastering, is selected as the edit-to-tape mode. To
do this, in the
Edit To Tape window, click the Video tab, and then select
Editing from the Mode menu.
6 When performing an edit-to-tape on some RS-422 devices, a delay may
occur between the time that Final Cut Pro starts to play back your project
and the time the device starts recording. To ensure that your edit-to-tape does