


64
Chapter 8, Calibrating Your HDMI Monitor for Video
Overview
Matrox MXO2 turns your HDMI monitor into a true-color video display for use
with HD and SD video. Controls for hue, chroma, contrast, brightness, and
blue-only let you adjust and control your HDMI monitor exactly as you would a
broadcast HD/SD video monitor.
¦NoteMXO2’s HDMI output supports 1:1 pixel mapping for accurate
monitoring of HD and SD video. However, your HDMI monitor must support
1920×1080 to preview all HD formats, and “dot-by-dot” mode for 1:1 pixel
mapping
.
HDMI monitor calibration requires you to:
1 Load and output color bars to your HDMI monitor.
2 Calibrate your HDMI monitor using MXO2’s proc amp controls.
Loading and displaying color bars
Color bars are used to calibrate your HDMI monitor. Depending on the
application that you use to output the color bars to your HDMI monitor, you can
use either the Matrox HD and SD color bars, or those supplied by a third-party
application, such as Final Cut Pro.
1 Ensure that your HDMI monitor is connected to MXO2’s HDMI output, turn
the HDMI monitor on, and allow it to warm up for about 20 or 30 minutes.
2 From an MXO2-supported QuickTime video application, such as Final Cut
Pro or After Effects, depending on the video standard for which you want to
calibrate your HDMI monitor, load and play back an HD or SD color bars
clip. You can choose one of the Matrox calibration color bars found in
Applications > Matrox MXO2 Utilities > Calibration Files, or one of
the color bars supplied by the application.
Remarks
$ If using Final Cut Pro to display color bars, you must select an MXO2
Easy Setup for your project and then make sure that the selected color
bars clip matches your project’s sequence setting. For more details, see
Chapter 9, “Loading a Matrox MXO2 Easy Setup.”
$ For 486p or 576p video, you can use an NTSC or PAL color bars clip.
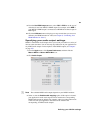
3 Set your application’s video output device setting to output to MXO2 (see
“Specifying your video and audio output device settings” on page 74).
¦NoteIn your application, select the output setting that matches your clip’s
format. For Final Cut Pro, select the MXO2 video playback setting that
matches your project’s sequence setting.
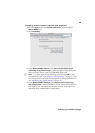
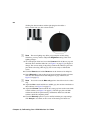
4 With the color bars clip visible on your HDMI monitor, pause the color bars
clip in your application.