


System Configuration 2-23
Click
Full
to do a full hard drive format.
Click
Exit
to terminate the restore process.
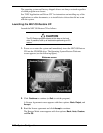
4.
After you select the type of hard drive format you want to do (Quick or
Full), the Formatting Drive(s) screen appears with a status bar showing the
progress of the formatting.
After the drive is reformatted, the Installing Applications screen appears,
indicating the status as the operating system loads from the CD.
The drivers and other software components required for the operating
system are also loaded from the CD.
After the OS finishes loading, the “Operating System Restore Completed”
screen appears. Go to step 6.
5.
To partition the hard drive, click
Continue
on the Partitioning the Hard
Drive screen. The Partition Information screen appears (in Windows 95 and
Windows 98 systems; in Windows NT 4.0 systems, the FAT16 Partition
warning appears as described in step 7).
6.
The Partition Information screen has three options and lets you select the
File Allocation Table (FAT) type to use for the operating system restore.
Click
Back
to return to the Operating Mode screen.
Click
FAT 16
to select the FAT16 allocation table (current FAT type).
Click
FAT 32
to select the FAT32 allocation table (available for
Windows 95 and Windows 98 systems only).
Note
:
Some older software may not work in a Windows
95 or Windows 98 system configured for FAT 32.
Note
:
In Windows NT 4.0 systems, the Partition
Information screen does not appear. Instead, the FAT16
Partition warning appears. This screen is described in the
following paragraph.
7.
After selecting the FAT type, a FAT 16 or FAT 32 Partition warning screen
appears indicating that the system is about to partition and format the hard
drive using the FDISK program. This warning screen contains three options:
Back
,
Exit
, and
Continue
.
8.
Click
Continue
. The following steps should take place.
System performs FDISK using the FAT type selected.
System reboots.