79
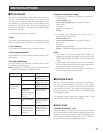
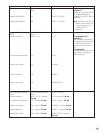
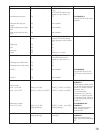
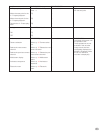
AUX 1/2
<Latch mode>
• AUX 1 (or 2) ON
• AUX 1 (or 2) OFF [SHIFT] + [AUX1 (or 2) OFF] [SHIFT] + [AUX1 (or 2) OFF]
<Momentary mode>
AUX 1 (or 2) ON [AUX1 (or 2) ON]
(Keep pressing.)
[SHIFT] + [AUX1 (or 2) ON]
(Keep pressing.)
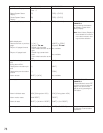
WV-CU950/650, WV-
CU360C/CJ:
When you release the but-
ton(s), auxiliary control
becomes OFF.
[AUX1 (or 2) ON] [SHIFT] + [AUX1 (or 2) ON]
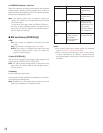
WV-CU950/650, WV-
CU360C/CJ:
• Mode setting is determined
by the DIP switch settings of
camera or auxiliary device
(receiver, etc.).
• To activate events
(sequence, etc.), set the
camera or auxiliary device
to the latch mode. (Refer to
the operating instructions of
camera.)
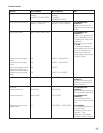
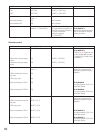
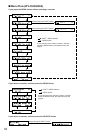
Open "BW Mode" main menu.
→
BW Mode Switching [SHIFT] + [CAM FUNC] two
times (BW setting menu
appears on the monitor. )
→
[F1]• Changes to the BW mode. [1]
[F2]• Changes to the color mode. [2]
[F3]• AUTO 1 Not available
WV-CU950/650:
If the camera has only one
AUTO mode, press this but-
ton.
[F4]• AUTO 2 Not available
[WIPER]
(Keep pressing.)
Wiper ON [SHIFT] + [WIPER] (Keep
pressing.)
WV-CU950/650, WV-
CU360C/CJ:
When you release the but-
ton(s), wiper control becomes
OFF
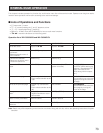
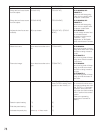
Function WV-CU950/650 WV-CU360C/CJ Note
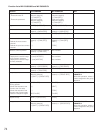
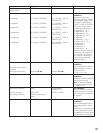
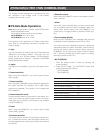
Auto pan Open "Auto Pan Setup" menu.
→
[SHIFT] + [CAM FUNC] four
times
(AUTO MODE setting menu
appears on the monitor. )
→
[F1]• Activates the auto pan. [1] WV-CU360C/CJ:
Pressing [AUTO PAN] is also
available.
[F2]• Reverses the auto pan
range.
Not available
[F3]• Sets the start point of auto
pan.
Not available
[F4]• Sets the end point of auto
pan.
Not available
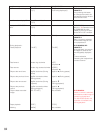
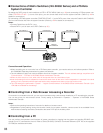
Open "Auto Mode" main
menu.
→
Auto mode [SHIFT] + [CAM FUNC] four
times (AUTO MODE setting
menu appears on the monitor.
)
→
[F1]• Sequence [3]
[F2] • Sort [2]
[F3]• Auto pan [1]
[F4]• Patrol Refer to p. 41 Patrol.


