


Chapter 27 SMT Menu 1 - General Setup
ZyWALL 2 Plus User’s Guide
456
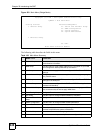
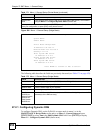
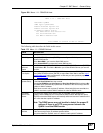
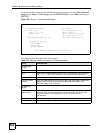
Figure 288 Menu 1.1.1: DDNS Host Summary
The following table describes the fields in this screen.
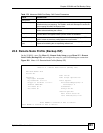
5 Select Edit in the Select Command field; type the index number of the DDNS host you
want to configure in the Select Rule field and press [ENTER] to open Menu 1.1.1 -
DDNS Edit Host (see the next figure).
Menu 1.1.1 DDNS Host Summary
# Summary
--- - -------------------------------------------------------
01 Hostname=ZyWALL,
Type=Dynamic,WC=Yes,Offline=No,Policy=DDNS Server
Detect, WAN1, HA=Yes
02 _______________________________________________________
_______________________________________________________
03 _______________________________________________________
_______________________________________________________
04 _______________________________________________________
_______________________________________________________
05 _______________________________________________________
_______________________________________________________
Select Command= None Select Rule= N/A
Press ENTER to Confirm or ESC to Cancel:
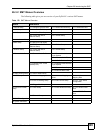
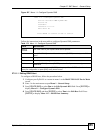
Table 174 Menu 1.1.1: DDNS Host Summary
FIELD DESCRIPTION
# This is the DDNS host index number.
Summary This displays the details about the DDNS host.
Select Command Press [SPACE BAR] to choose from None, Edit, Delete, Next Page or Previous
Page and then press [ENTER]. You must select a DDNS host in the next field
when you choose the Edit or Delete commands.
Select None and then press [ENTER] to go to the "Press ENTER to Confirm…"
prompt.
Use Edit to create or edit a rule. Use Delete to remove a rule. To edit or delete a
DDNS host, first make sure you are on the correct page. When a rule is deleted,
subsequent rules do not move up in the page list.
Select Next Page or Previous Page to view the next or previous page of DDNS
hosts (respectively).
Select Rule Type the DDNS host index number you wish to edit or delete and then press
[ENTER].
When you have completed this menu, press [ENTER] at the prompt "Press ENTER to Confirm…" to
save your configuration, or press [ESC] at any time to cancel.