


Configuring Communication
39
NXD-500i 5" Wall/Flush Mount Touch Panel with Intercom
1. Launch your web browser.
2. Enter the IP Address of the target Master (ex: http://198.198.99.99) into the web browser’s Address
field.
3. Press the Enter key on your keyboard to begin the communication process between the target
Master and your computer.
Initially, the Master Security option is disabled from within the System Security page, and no
username and password is required for access or configuration.
Both HTTP and HTTPS Ports are enabled by default via the Manage System > Server page.
If the Master has been previously configured for secured communication, click OK to accept
the AMX SSL certificate (if SSL is enabled) and then enter a valid username and password
into the fields within the Login dialog.
4. Click OK to enter the information and proceed to the Master’s Manage WebControl Connections
window.
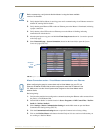
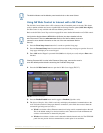
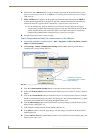
5. The Manage WebControl Connections page (FIG. 29) is accessed by clicking on the Manage
connections link within the Web Control section in the Navigation frame. Once activated, this page
displays links to G4 panels running the latest G4 Web Control feature previously setup and activated
on the panel.
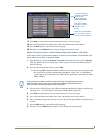
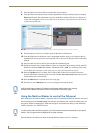
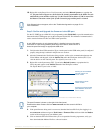
6. Click on the G4 panel name link associated with the target panel. A secondary web browser window
appears on the screen (FIG. 30).
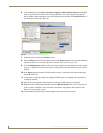
7. Click Yes from the Security Alert popup window to agree to the installation of the G4 WebControl
application on your computer. This application contains the necessary Active X and VNC client
applications necessary to view and control the panel pages from your computer.
FIG. 29 Manage WebControl Connections page (populated with compatible panels)
Compatible
devices field
G4 panels
Compression
Options
(showing G4
WebControl links)