


Serial Device Control
44
TVM-1600 Endeleo Managed TV Distribution Hub
Initializing the TVM-RX03 For Serial Control and Display Device’s Baud Rate
1.
A console session needs to be opened on the TVM-1600. The configuration settings for the
Terminal session are:
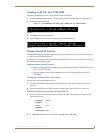
2. At the command prompt enter the following command:
r serial X (Baud Rate)
Where X is the port number the TVM-RX03 unit is attached to.
The baud rate should be the value specified by the device manufacturer.
Entering the baud rate is optional, and if no baud rate is entered then the default is 9600 bits
per second.
Baud rates of 1200, 2400, 4800, 9600, and 19200 bps are supported.
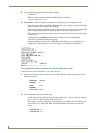
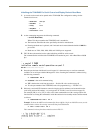
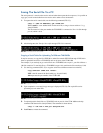
3. FIG. 50 shows the terminal session when initializing an RX for serial control.
The command below initialized the TVM-RX03 unit attached to port 1 with a Baud Rate of 9600
bps.
4. Once the port has been initialized for serial control, it is then necessary to associate commands
available via its serial port with the Managed TV codes. Learning the command is achieved using
the following command
r “aaaaaaaa” XX Y
aaaaaaaa is the serial command string,
XX is the function code from Appendix A – Endeleo IR codes section on page 41
Y is the port number of the TVM-RX03 unit to be programmed e.g. r “PwrOff” 12 1.
5. Obviously, certain ASCII characters cannot be simply typed in and these can be entered into the
serial string enclosed in brackets: < > (see Appendix B – ASCII Control Set section on page 43).
For example [CR] is <13>, [LF] is <10>, so the same command above with a carriage return and
line feed and associating the command to switch the end device into standby mode would be entered
as follows:
r “aaaaaaaa<13><10>” 12 1
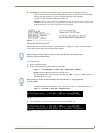
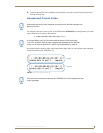
Example: To learn the ASCII serial command for Power Off (ka 1 0) for an LG LCD screen, use the
command below. Notice the carriage return and line feed added below.
r “ka 1 0<13><10>” 12 1
This command is shown from the terminal session in FIG. 51.
•Baud Rate: 9600 bps
• Data Bits: 8
• Parity: None
• Stop Bits: 1
• Flow Control: None
FIG. 50
Initialize serial control on port 1
FIG. 51 Successful sent serial string to port 1