


Canon FAX-L800 User’s Guide ENGLISH
16-5Chapter 16 Summary of Important Settings
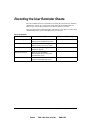
5.TX TERMINAL ID Print your ID (transmitting terminal ID) on each page you transmit.
(Q3-11)
ON After you turn the terminal ID ON, you can do the following
settings.
1.TTI POSITION
OUTSIDE IMAGE Terminal ID prints outside the image
border
INSIDE IMAGE Terminal ID prints inside the image
border.
2.TELEPHONE # MARK You can prefix your number with the
abbreviations FAX or TEL in your
sender ID.
FAX Prefixes the number with the
abbreviation FAX.
TEL Prefixes the number with the
abbreviation TEL.
OFF No terminal ID is not printed on the pages you send.
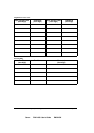
6.DENSITY CONTROL Adjust the scanning density from 1-5 for DK (2 is default), 2-6 for
STD (4 is default), 3-7 for LT (6 is default).
7. SCAN RESOLUTION Set the default value for the SUPER FINE setting of the
RESOLUTION button on the operation panel. (Q6-4)
SUPER FINE Scans at 8 dots/mm, 15.4 lines/mm.
ULTRA FINE Scans at 16 dots/mm, 15.4 lines/mm.
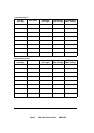
8.PROGRAM KEY Use the program button to streamline the procedures for printing
activity reports or doing the scanner settings. (Q12-4)
PRINT REPORT Press the PROGRAM button whenever you need a transmission
report for a document you are sending.
REPORT If you select this setting, you do not have to open both One-touch
Speed Dialling panels to start printing a report. Whenever you need
to print a report, press the PROGRAM button.
SCANNING MODE Set the scanner buttons (Resolution, Contrast, Document Type) for
special settings, like sending a photograph for example. Then you can
adjust all the settings just by pressing the PROGRAM button.
STAMP If you have installed the optional stamp feature, this option is
available. If you select STAMP you can turn the stamp feature on or
off without opening both One-touch Speed Dialling panels to press
the STAMP button.