


2-63
Cisco Aironet 1550 Series Outdoor Mesh Access Point Hardware Installation Guide
OL-24247-01
Chapter 2 Installing the Access Point
What to Do Next
To configure the BGN for the access points using the GUI, follow these steps:
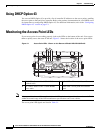
Step 1 Log into your controller using a web browser.
Step 2 Click Wireless. When access points associates to the controller, the name of the access point appears in
the AP Name list.
Step 3 Double-click on an access point name.
Step 4 Find Mesh Information, and enter the new BGN in the Bridge Group Name field.
Step 5 Click Apply.
Step 6 Repeat Steps 2 through 5 for each access point.
Step 7 Log out from your controller, and close your web browser.
What to Do Next
When you power up a MAP that is not connected to a wired Ethernet, fiber-optic, or cable network to
the controller, the access point uses the Cisco Adaptive Wireless Path Protocol (AWPP) to bind to
another mesh access point (MAP) with the best path to a root access point (RAP) connected to the wired
network to a controller. The access point sends a discovery request when powered up. If you have
configured the access point in the controller correctly, the controller sends back a discovery response to
the access point. When that happens, the access point sends out a join request to the controller, and the
controller responds with a join confirmation response. Then the access point establishes a Control And
Provisioning of Wireless Access Points (CAPWAP) connection to the controller and gets the shared
secret configured on the controller.
Refer to the Cisco Wireless LAN Controller Configuration Guide for more information on configuring,
monitoring, and operating your access points.