


2-26
Cisco Aironet 1550 Series Outdoor Mesh Access Point Hardware Installation Guide
OL-24247-01
Chapter 2 Installing the Access Point
Mounting the Access Point
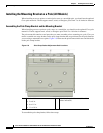
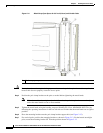
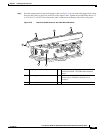
Figure 2-16 Access Point 1552I Hanging in Mounting Bracket
Step 3
Screw a M8 x16 bolt (with flat and lock washers) into the second bolt hole on each side of the access
point (see Figure 2-15).
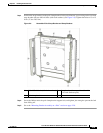
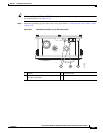
Step 4 Depending on what you purchased, ensure that the front of the 1552E/EU access point is vertical, or that
the 1552I access point is horizontal, and tighten the four bolts to 13 to 15 ft lbs
(17.6 to 20.3 Nm).
Step 5 For the 1552E/EU model continue with Installing Antennas, page 2-36. For the 1552I model continue
with Grounding the Access Point, page 2-41 and Powering the Access Point, page 2-45.
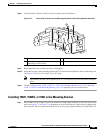
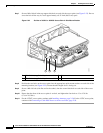
Installing 1552C or 1552CU in the Mounting Bracket
There are three different options for mounting the 1552C or 1552CU access point:
• Cable Strand Mounting the 1552C or 1552CU Access Point, page 2-26
• Mounting the 1552C or 1552CU Access Point on a Pole/Wall, page 2-30
• Mounting the 1552C or 1552CU Access Point Facing Up in a Vault Application, page 2-33
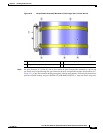
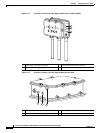
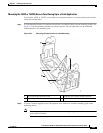
Cable Strand Mounting the 1552C or 1552CU Access Point
When mounting the access point on a cable strand, you must use the optional strand mount kit. The kit
contains several parts that you should assemble before mounting on a cable strand. To install the access
point to a cable strand, you need to perform these operations:
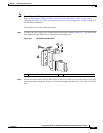
• Assemble cable brackets; attach cable clamps to the clamp bracket.
• Attach the strand brackets to the access point.
• Attach the clamp bracket to the fiber or cable strand.
• Attach a ground wire.
• Connect cables and power to the access point.
Note The access point must be installed on a cable strand by a professional cable installer.
345826