


2-4 Dell PowerEdge 4100/180 and 4100/200 Systems Installation and Troubleshooting Guide
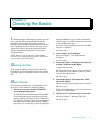
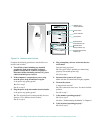
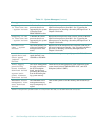
Figure 2-2. Switches and Controls
Complete the following procedure to check all the con-
nections and switches:
1. Turn off the system, including any attached
peripherals (such as the monitor, keyboard,
printer, external drives, scanners, or plotters).
Disconnect all the alternating current (AC) power
cables from their power sources.
2. If the computer is connected to a power strip,
turn the power strip off and then on again.
Is the power strip getting power?
Ye s . Go to step 5.
No. Go to step 3.
3. Plug the power strip into another electrical outlet.
Is the power strip getting power?
Ye s . The original electrical outlet probably does not
function. Use a different electrical outlet.
No. Go to step 4.
4. Plug a lamp that you know works into the elec-
trical outlet.
Does the lamp get power?
Ye s . The power strip is probably not functioning
properly. Get another power strip.
No. Go to step 5.
5. Reconnect the system to AC power.
Make sure that all connections fit tightly together.
6. Turn on the system.
Is the problem resolved?
Ye s . The connections were loose. You have fixed the
problem.
No. Go to step 7.
7. Is the monitor operating properly?
Ye s . Go to step 8.
No. Go to “Troubleshooting the Monitor” in Chapter 6.
8. Is the keyboard operating properly?
Ye s . Go to step 9.
power switch
reset button
hard-disk drive
online indicator (6)
power indicator
diskette-drive
access indicator
hard-disk drive
activity indicator (6)
hard-disk drive failure
indicator (6)