


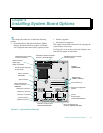


Installing System Board Options 8-3
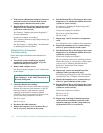
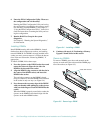
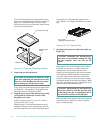
Connectors EISA1 through EISA3 support 32-bit EISA
master or slave cards, and 8- and 16-bit ISA cards. Con-
nectors PCI4 through PCI8 support 32-bit PCI cards.
Video expansion cards should be installed in one of the
three primary PCI slots (PCI6, PCI7, or PCI8).
Figure 8-3. Expansion-Card Connectors on the
System Board
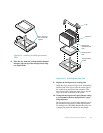
Installing an Expansion Card
Follow this general installation procedure:
1. If you are installing an ISA expansion card, start
the EISA Configuration Utility, and add the new
expansion card to the configuration information.
See Chapter 5, “Using the EISA Configuration Util-
ity,” in the system User’s Guide for instructions.
NOTES: If you are installing an EISA expansion
card, you should normally run the EISA Configura-
tion Utility after installing the expansion card.
If you are installing a PCI expansion card, your sys-
tem automatically performs any required PCI
configuration tasks during the boot routine.
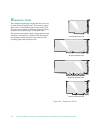
2. Prepare the expansion card for installation, and
remove the left computer cover.
See “Removing the Computer Covers” in Chapter 7.
See the documentation that came with the expansion
card for information on configuring the card, making
internal connections, or otherwise customizing it for
the system.
3. Unscrew and remove the metal filler bracket that
covers the card-slot opening for the expansion
slot you intend to use.
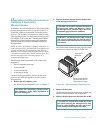
4. If the expansion card is full-length, check that the
locking cam on the corresponding locking card
guide is in the raised or “unlocked” position.
Insert the end of the expansion card in the card
guide slot and lower the card into the chassis.
5. Insert the card-edge connector firmly into the
expansion-card connector on the chassis.
6. When the card is firmly seated in the connector
and the card-mounting bracket is flush with the
brackets on either side of it, secure the bracket
with the screw you removed in step 3.
If the expansion card is full-length, close the locking
cam on the card guide to secure the card.
7. Connect any cables that should be attached to the
card.
See the documentation that came with the card for
information about cable connections.
8. Replace the left computer cover, reconnect the
computer and peripherals to their power sources,
and turn them on.
9. Start the EISA Configuration Utility and add the
new expansion card to the configuration.
See Chapter 5, “Using the EISA Configuration Util-
ity,” in the system User’s Guide for instructions.
NOTE: If you installed a PCI expansion card, the
system automatically performs any required PCI
configuration tasks during the boot routine.
Removing an Expansion Card
Follow this general procedure to remove an expansion
card:
1. If you are relocating or removing an ISA expan-
sion card permanently, start the EISA
CAUTION: See “Protecting Against Electro-
static Discharge” in the safety instructions at
the front of this guide.
EISA
expansion-card
connectors
(EISA1–EISA3)
PCI expansion-
card connectors
(PCI4–PCI8)