


Checking Inside the Computer 7-13
5. Reseat the DIMMs in their sockets.
See “Adding Memory” in Chapter 8 for instructions
on removing and replacing DIMMs.
6. Replace the computer cover, reconnect the system
to AC power, and turn it on.
7. Enter the System Setup program and check the
TOTAL MEMORY
or
SYSTEM MEMORY
category again.
Does the amount of memory installed match the
TOTAL MEMORY
or
SYSTEM MEMORY
setting?
Ye s . Go to step 8.
No. Go to step 9.
8. Reboot the system, and observe the monitor
screen and the Num Lock, Caps Lock, and Scroll
Lock indicators on the keyboard.
Does the monitor screen remain blank, and do the
Num Lock, Caps Lock, and Scroll Lock indicators
on the keyboard remain on?
Ye s . Go to step 9.
No. Go to step 11.
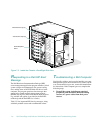
9. Turn off the system, disconnect it from AC power,
and remove the left computer cover.
10. If possible, swap the DIMM in socket DIMM A
with one of the same capacity, reboot the system,
and observe the monitor screen and the indica-
tors on the keyboard.
Is the problem resolved?
Ye s . You have fixed the problem.
No. Go to step 11.
11. Run the RAM Test Group in the system
diagnostics.
See Chapter 5, “Running the System Diagnostics.”
Do the tests complete successfully?
Ye s . You have fixed the problem.
No. See Chapter 11, “Getting Help,” for instructions
on obtaining technical assistance.
T
roubleshooting the Video
Subsystem
Troubleshooting video problems involves determining
which of the following is the source of the problem: the
monitor, the monitor interface cable, the video memory,
or the video logic of the computer. You can also have a
high-resolution video expansion card installed, which
overrides the video logic of the computer.
The following procedure troubleshoots problems with the
video memory and video logic only. Before you begin,
perform the procedure found in “Troubleshooting the
Monitor” in Chapter 6 to determine whether or not the
monitor is the source of the problem.
If you have a high-resolution video expansion card, first
complete the steps in “Troubleshooting Expansion
Cards” found earlier in this chapter to verify that the card
is configured and installed correctly.
Follow these steps to troubleshoot the video subsystem:
1. Run the Video Test Group in the system
diagnostics.
See Chapter 5, “Running the System Diagnostics.”
Most of the tests in the Video Test Group are inter-
active; that is, you must respond before the
diagnostics continues with the next test.
Do the tests complete successfully?
Ye s . It is not a video hardware problem. Go to Chap-
ter 4, “Finding Software Solutions.”
No. Go to step 2.
2. Turn off the system, including any attached
peripherals, and disconnect all the AC power
cables from their power sources.
3. Remove the left computer cover.
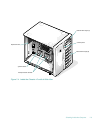
See “Removing the Computer Covers” found earlier
in this chapter.
CAUTION: See “Protecting Against Electro-
static Discharge” in the safety instructions at
the front of this guide.