


8-6 Dell PowerEdge 4100/180 and 4100/200 Systems Installation and Troubleshooting Guide
6. Enter the EISA Configuration Utility. Then save
the configuration and exit the utility.
Running the EISA Configuration Utility and saving
the configuration is required for the system to recog-
nize the newly installed DIMM(s). See Chapter 5,
“Using the EISA Configuration Utility,” in the User’s
Guide for instructions on running the utility and sav-
ing the configuration.
7. Run the RAM Test Group in the system
diagnostics.
See Chapter 5, “Running the System Diagnostics,”
for information.
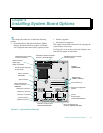
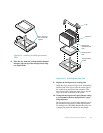
Installing DIMMs
Install DIMMs starting with socket DIMM A, located
farthest from the microprocessor sockets, and working
towards DIMM H. If a DIMM is already installed in the
socket you need, you must remove it. Follow the instruc-
tions in the next subsection, “Removing DIMMs,” if
appropriate.
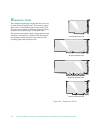
To install a DIMM, follow these steps:
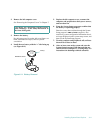
1. Press the ejectors on the DIMM socket down and
outward as shown in Figure 8-4 to allow the
DIMM to be inserted in the socket.
2. Align the DIMM’s edge connector with the slot in
the center of the DIMM socket, and insert the
DIMM in the socket.
The card-edge connector on the DIMM is keyed
using two notches so that the DIMM can be installed
in the socket in only one way (see Figure 8-4).
3. Press down on the two outer edges of the DIMM
with your thumbs while pulling up on the ejectors
with your index fingers to lock the DIMM into the
socket.
When the DIMM is properly seated in the socket, the
ejectors on the DIMM socket should align with the
ejectors on the other DIMM sockets.
Figure 8-4. Installing a DIMM
4. Continue with step 4 of “Performing a Memory
Upgrade” found earlier in this section.
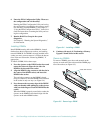
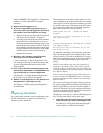
Removing DIMMs
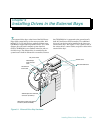
To remove a DIMM, press down and outward on the
ejectors on each end of the socket until the DIMM pops
out of the socket (see Figure 8-5).
Figure 8-5. Removing a DIMM
notch
1.
2.
1.
2.
press down and out