


8-10 Dell PowerEdge 4100/180 and 4100/200 Systems Installation and Troubleshooting Guide
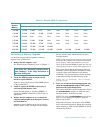
labeled “200MHZ.” (See Appendix C, “Jumpers and
Switches,” for more information on jumper
locations.)
11. Replace the left computer cover.
12. If you have upgraded the microprocessor to a
faster one, remove the old badge from the front of
the computer bezel and install the new badge:
a. Remove the bezel according to the instructions in
“Removing the Front Bezel” in Chapter 7.
b. The badge is secured to the front bezel with three
metal tabs. Press on all three tabs at once to re-
lease the detent that holds the badge in place, and
then push the tabs out of the front bezel. To install
the new badge, insert the three metal tabs through
the slots in the front bezel and press on the badge
until the detents on the tabs lock into place.
c. Replace the front bezel.
13. Reconnect your computer and peripherals to
their power sources, and turn them on.
As the system boots, it detects the presence of the
new microprocessor and automatically changes the
system configuration information in the System
Setup program.
14. Press <
F2
> to enter the System Setup program, and
check that the
PROCESSOR 1 and PROCESSOR 2
cat-
egories match the new system configuration.
See Chapter 4, “Using the System Setup Program,”
in the system User’s Guide for instructions.
15. Run the system diagnostics to verify that the new
microprocessor is operating correctly.
See Chapter 5, “Running the System Diagnostics,”
for information.
R
eplacing the Battery
The system battery maintains system configuration, date,
and time information in a special section of memory
when the system is turned off.
The operating life of the battery ranges from two to five
years, depending on how the system is used (for example,
if the system is on most of the time, the battery gets little
use and thus lasts longer). The battery may need replac-
ing if an incorrect time or date is displayed during the
boot routine along with a message such as:
Time-of-day not set — please run SETUP
program
Strike the F1 key to continue, F2 to run
the setup utility
or
Invalid configuration information — please
run SETUP program
Strike the F1 key to continue, F2 to run
the setup utility
To determine if the battery needs replacing, reenter the
time and date through the System Setup program. Turn
off the system for a few hours, and then turn it on again.
Enter the System Setup program. If the date and time are
not correct in the System Setup program, replace the
battery.
NOTES: Some software may cause the system time to
speed up or slow down. If the system seems to operate
normally except for the time kept in the System Setup pro-
gram, the problem may be caused by software rather than
by a defective battery.
If the system is turned off for long periods of time (for
weeks or months), the NVRAM may lose its system con-
figuration information. This situation is not caused by a
defective battery.
The system can be operated without a battery; however,
the system configuration information maintained by the
battery in NVRAM is erased each time the computer is
turned off. Therefore, the system configuration informa-
tion must be reentered and the options reset each time the
system boots until the battery is replaced.
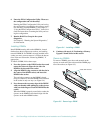
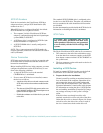
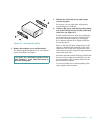
The battery is a 3.0-volt (V), coin-cell CR2450-type bat-
tery. To remove the battery, follow these steps:
1. If possible, enter the System Setup program and
make a printed copy of the system setup screens.
See Chapter 4, “Using the System Setup Program,”
in the system User’s Guide for instructions.