


Optical Drive 29
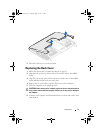
Replacing the Optical Drive
1
Follow the instructions in "Before You Begin" on page 11.
2
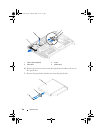
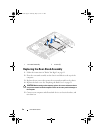
Align the screw holes on the optical-drive bracket with the screw holes on
the optical drive.
3
Replace the two screws that secure the optical-drive bracket to the optical
drive.
4
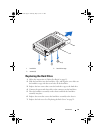
Slide the optical-drive assembly into the optical-drive bay.
5
Replace the screw that secures the optical-drive assembly to the chassis.
6
Connect the power and data cables to the connector on the optical drive.
7
Replace the back cover. See "Replacing the Back Cover" on page 21.
CAUTION: Before turning on the computer, replace all screws and ensure that no
stray screws remain inside the computer. Failure to do so may result in damage to
the computer.
8
Connect your computer and all attached devices to electrical outlets, and
turn them on.
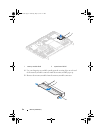
1 screws (2) 2 optical-drive bracket
3 optical drive
book.book Page 29 Thursday, May 3, 2012 1:21 PM