


Memory Module(s) 33
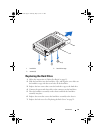
Replacing Memory Module(s)
CAUTION: If the memory module is not installed properly, the computer may not
boot.
1
Follow the instructions in "Before You Begin" on page 11.
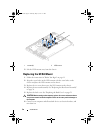
2
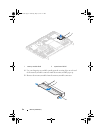
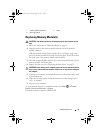
Align the notch in the memory module with the tab in the memory-
module connector.
Slide the memory module firmly into the slot at a 45-degree angle, and
press the memory module down until it clicks into place. If you do not hear
the click, remove the memory module and reinstall it.
3
Place the memory-module shield on the system-board shield and snap the
memory-module shield into place.
4
Replace the back cover. See "Replacing the Back Cover" on page 21.
CAUTION: Before turning on the computer, replace all screws and ensure that no
stray screws remain inside the computer. Failure to do so may result in damage to
the computer.
5
Connect your computer and all attached devices to electrical outlets, and
then turn them on.
6
When the message appears stating that memory size has changed, press
<F1> to continue.
7
Log on to your computer.
To verify that the memory is installed correctly, click Start Control
PanelSystem and Security System.
Check the amount of memory (RAM) listed.
1 memory-module connector 2 notch
3 securing clips (2)
book.book Page 33 Thursday, May 3, 2012 1:21 PM